Month: August 2020
Deploying a Custom SSD MobileNet Model on the NVIDIA Jetson Nano
In this post, we explain how we deployed an SSD MobileNet TensorFlow model on NVIDIA Jetson Nano using the TensorFlow Object Detection API.
This is a tutorial on Deploying a Custom SSD-MobileNet-V2 Model on the NVIDIA Jetson Nano. The resulting code is available on Galliot’s GitHub repository.
Find Galliot’s other Computer Vision Products on this page.
More and better data results in more robust models; Explore Data Labeling Approaches and Challenges
Embedded devices, such as NVIDIA Jetson Nano, enable powerful AI-based applications in real-time at very low power and cost. However, deploying deep learning models to these devices requires model optimization, which is not always straightforward. In this post, we explain how we deployed a retrained SSD MobileNet TensorFlow model on an NVIDIA Jetson Nano development kit using the latest version of the TensorFlow Object Detection API. We also investigated the errors that we encountered during the procedure and how we solved each one.
1. The workflow
NVIDIA TensorRT is a programmable inference accelerator that facilitates high-performance inference on NVIDIA GPUs. TensorRT takes a trained neural network as input and generates a TensorRT engine, a highly optimized runtime engine that performs inference efficiently. TensorRT-based applications perform up to 40x faster than CPU-only platforms during inference. TensorRT SDK provides FP16 and INT8 optimizations to perform low-latency inference with little to no degradation in model accuracy.
TensorRT takes your network definition, performs several optimizations, and generates a TensorRT engine to optimize your model for inference. The optimizations include platform-specific optimizations, layer optimizations, operation optimizations, etc. Visit TensorRT Developer Guide by NVIDIA to learn more about TensorRT and how it performs optimizations.
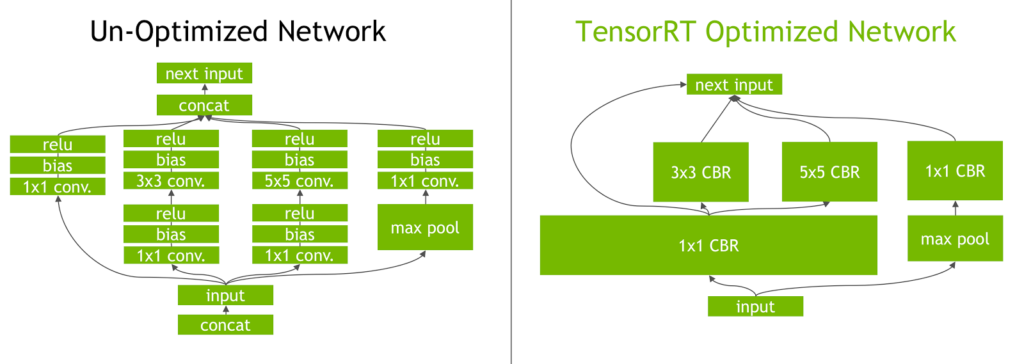
Figure 1. The Inception module from the GoogLeNet architecture, before and after TensorRT layer optimizations.
(source: NVIDIA Developer Blog)
Models trained with TensorFlow can be deployed on Jetson Nano in two ways: you can either use TensorFlow with TensorRT (TF-TRT) or convert the TensorFlow model to UFF (Universal Framework Format) and generate a TensorRT execution engine from that. The full documentation on how to use TensorFlow with TensorRT (TF-TRT) is available here. We will focus on the second approach for this post as it outperforms TF-TRT.
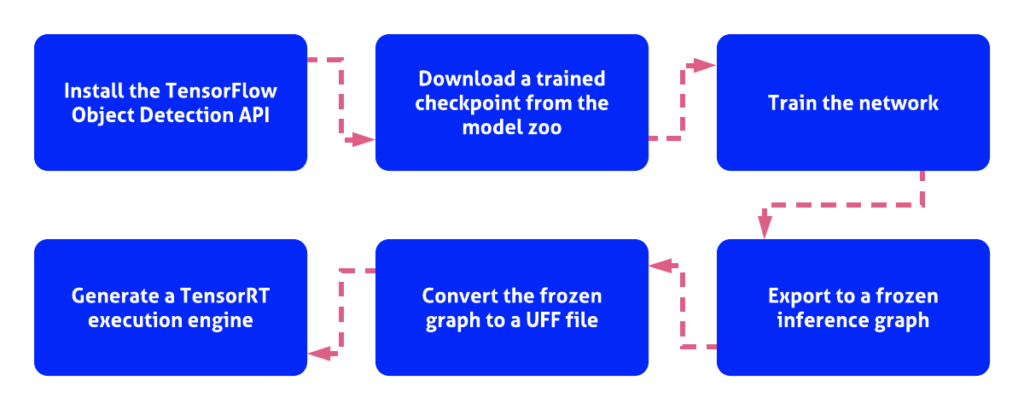
To construct a TensorRT engine, first, download and install the TensorFlow Object Detection API. The easiest way to get this API installed is to use a Docker container. You can run Galliot’s Docker container by following the instructions here to install TensorFlow Object Detection API with minimal effort.
After getting the API installed, you need to download a trained checkpoint from the TensorFlow object detection model zoo, where you can explore various pre-trained models. For this tutorial, we used the SSD MobileNet V2 COCO model. You can train the network starting from the downloaded checkpoint using your training data. Before starting the training procedure, you might need to make some changes to the corresponding config file (find it here). We changed the number of classes to one object class, i.e., pedestrian, to use this model in our Smart Social Distancing application.
When training is completed, export the trained model to a frozen inference graph using the export_inference_graph.py tool. Now we need to: 1- convert the frozen graph to a UFF file and 2- generate a TensorRT execution engine from the UFF file.
Constructing a TensorRT engine by following the steps illustrated in Figure 1 may seem straightforward enough, but it is not. The problem is that the latest version of the TensorFlow Object Detection API is not compatible with the tools and configuration files required for UFF parsing and generating a TensorRT engine from a UFF file. Therefore, you have to decide between using a relatively old version of the Object Detection API (from early 2018) without all the new features and optimizations or using the latest version of the Object Detection API and trying to fix all the compatibility issues that will arise during the procedure. Fortunately, it is not that difficult to fix compatibility issues, so let’s do that.
In the next section, we explain how to perform the TensorRT conversion process and describe the problems we encountered during the conversion process as well as the fix to each one. We were able to successfully convert a custom SSD MobileNet model to UFF and build a TensorRT engine by applying the below fixes to each problem.
Software used:
- TensorFlow 1.15
- TensorRT 6.0.1.10 – Jetpack 4.3
- Python 3.6
- TensorFlow Object Detection API. May 8, hash:
394baa9f21424d3522ccfbdcee8acd3840891ff6
The following fixes are also tested using the TensorRT version 7.0.0.11 using an NGC Docker container on an AMD64 node with all the steps required.
2. Generating TensorRT engine
You can use NVIDIA’s convert-to-uff.pbUFF. You should call this tool with a -p
In this post, we used the single program setup instead of using the convert-to-uff
Installing the Prerequisites
To perform the conversion process, you need to have Jetpack 4.3, TensorFlow 1.15, and PyCuda installed on the Jetson Nano. You can either install each requirement separately or run Galliot’s Docker container to get all the required dependencies installed on your device in just a few minutes.
This Docker container installs all the prerequisites, including PyCuda, and runs the install.shtensorrt_demoslibflattenconcat.soinstall.shbuild_engine.py
Configurations
To use Galliot’s TensorRT Generation Tool, you should first add your custom model specs to the config file that matches your model. We have provided sample config files for SSD MobileNet v1 and v2 here.
You may need to customize the number of classes by changing the num_classes.pbtxt
[MODEL]
Name = ssd_mobilenet_v2_coco
Input = /repo/ssd_mobilenet_v2_coco.pb
; Path to the Input Frozen Inference Graph
TmpUFF = /repo/tmp_ssd_mobilenet_v2_coco.uff
; Path for writing the output UFF model
OutputBin = /repo/TRT_ssd_mobilenet_v2_coco.bin
; Path for writing the output TensorRT Engine
NumberOfClasses = 91
; number of classes plus one for the background class
MinSize = 0.2
MaxSize = 0.95
InputOrder = 1,0,2
; Order of `loc_data`, `conf_data`, and `priorbox_data` of the model, which is set equal to the `NMS` node input order in the `.pbtxt` file
InputDims = 3,300,300
; Input Dimension of the model
DownloadPath = https://raw.githubusercontent.com/jkjung-avt/tensorrt_demos/master/ssd/ssd_mobilenet_v2_coco.pb
; Model Download Path

[LIBFLATTENCONCAT]
Path = /repo/libflattenconcat.so.6
Conflicts and errors
Since we wanted to use the latest version of the TensorFlow Object Detection API, there were a few compatibility issues that we needed to take care of. We made a few changes to the build_engine.py
FusedBatchNormV3 error
[TensorRT] ERROR: UffParser: Validator error: FeatureExtractor/MobilenetV2/layer_19_2_Conv2d_4_3x3_s2_256/BatchNorm/FusedBatchNormV3: Unsupported operation _FusedBatchNormV3
The FusedBatchNormV3FusedBatchNorm
AddV2 error
[TensorRT] ERROR: UffParser: Validator error: FeatureExtractor/MobilenetV2/expanded_conv_15/add: Unsupported operation _AddV2
Similar to the previous conflict, this error was raised because AddV2 is not supported by the TensorRT 6. To fix this issue, we replaced AddV2Add, as shown here.
Cast error
[TensorRT] ERROR: UffParser: Validator error: Cast: Unsupported operation _Cast
This error was raised because the model included an Input operation that is not supported by the TensorRT 6, which is the Cast operation. TensorFlow version 1.15 has replaced this operation with the toFloat operation. Therefore, we should add Cast to the namespace_plugin_map
namespace_plugin_map = {
"MultipleGridAnchorGenerator": PriorBox,
"Postprocessor": NMS,
"Preprocessor": Input,
"Cast": Input,
"ToFloat": Input,
"image_tensor": Input,
"MultipleGridAnchorGenerator/Concatenate": concat_priorbox, # for 'ssd_mobilenet_v1_coco'
"Concatenate": concat_priorbox,
"concat": concat_box_loc,
"concat_1": concat_box_conf
}
GridAnchor error
[libprotobuf FATAL /externals/protobuf/aarch64/10.0/include/google/protobuf/repeated_field.h:1408] CHECK failed: (index) < (current_size_):
The UFF parser raised this error because the UFF file did not provide an input element for the GridAnchorGridAnchor node:
def parse_gridAnchor(graph):

data = np.array([1, 1], dtype=np.float32)
anchor_input = gs.create_node("AnchorInput", "Const", value=data)
graph.append(anchor_input)
graph.find_nodes_by_op("GridAnchor_TRT")[0].input.insert(0, "AnchorInput")

return graph
All of the errors and conflicts above are fixed here on Galliot’s GitHub repo. You can use the provided Docker container and customize the config file to generate a TensorRT engine on Jetson Nano from your SSD MobileNet model.
3. Conclusion
Deploying a custom deep learning model on embedded devices is a challenging task. In this tutorial, we went through deploying a custom SSD MobileNet model on Jetson Nano and explained some issues we faced when trying to convert a frozen graph retrained by the latest version of the TensorFlow Object Detection API to a UFF file using TensorRT, as well as the fixes we applied to those problems. Check out Galliot’s GitHub repo for more.
Further Readings
1) Deploying SSD mobileNet V2 on the NVIDIA Jetson and Nano platforms
This blog post explains the challenges faced while deploying a customized object detection neural network on NVIDIA-based mobile platforms like Jetson and Nano and how the authors found solutions to those problems. They provide a configuration file and code that can be used to deploy pre-trained networks.
2) NVIDIA Deep Learning TensorRT Documentation
This guide explains the NVIDIA TensorRT 8.6.0 Early Access (EA) samples on GitHub and the product package. These samples cover areas like image classification, object detection, recommenders, character recognition, and machine comprehension.
3) TensorRT Python Sample for Object Detection
This is a GitHub repository that contains code for object detection using TensorRT, an NVIDIA library for optimizing deep learning models.
Smart Social Distancing Tutorial
Smart Social Distancing is an open-source application by Galliot. Read this tutorial to learn how the Smart Social Distancing application works.
This open-source solution is now available as part of a standalone product at Lanthorn.ai.
You can skip to the second part of this work and read about the new codebase architecture.
Head out to our GitHub repository to read the application setup guide.
Find out about how to address your data labeling needs in this Galliot blog post.
As a response to the coronavirus (COVID-19) pandemic, Galliot has released an open-source application that helps people practice physical distancing rules in different places such as retail spaces, construction sites, factories, healthcare facilities, etc. This guide provides a technical overview of the approach to smart social distancing. Familiarity with deep learning computer vision methods and edge deep learning devices, such as Jetson Nano or Edge TPU, is recommended to follow this guide. You can read an updated version of this tutorial to learn more about the new code base architecture here.
1. Distancing Problem Description
Social distancing (also physical distancing) is one approach to control and prevent the rate of infection of different contagious diseases, e.g., coronavirus and COVID-19, which is currently causing one of the largest pandemics in human history. Current solutions to practice social distancing are either not practical or not viable in the long-term. Please visit this blog post to read more about why current approaches fail and why we need a more robust approach.
2. Galliot’s Solution; The Smart Social Distancing Application
Our approach uses artificial intelligence and edge AI devices such as Jetson Nano or Edge TPU to track people in different environments and measure adherence to social distancing guidelines. It can give proper notifications each time social distancing rules are violated. Our solution can be modified to work in real-time by processing a USB or Camera Serial Interface. The demo runs on a video that can be provided via the configuration file.
3. Setup the Distancing Application
You will need an Nvidia Jetson Nano or an Edge TPU device to run this tutorial. We are making this application available on other devices. Please find more details about compatible devices here.
3.1. Galliot GitHub Repository
Neuralet is Galliot’s open-source platform for edge deep learning models on GPU, TPU, and more. The source code of the Smart Social Distancing application is available on our GitHub repository. You can find the setup guide in the project Readme.
Clone this repository to get started with the Galliot Smart Social Distancing application:
git clone https://github.com/neuralet/neuralet.git
cd neuralet/applications/smart-distancing/
3.2. Object Detection Model
The core of this application uses Convolutional Neural Networks to detect pedestrians. We are working on adding more models, but as of right now, we use the pre-trained SSD MobileNet V2, which is trained on the MS COCO dataset for the proof of concept. We extract the “person” class of this model as the pedestrian detector.
The model can be swapped easily in libs/core.py.libs/detectors/jetson
4. Codebase Architecture
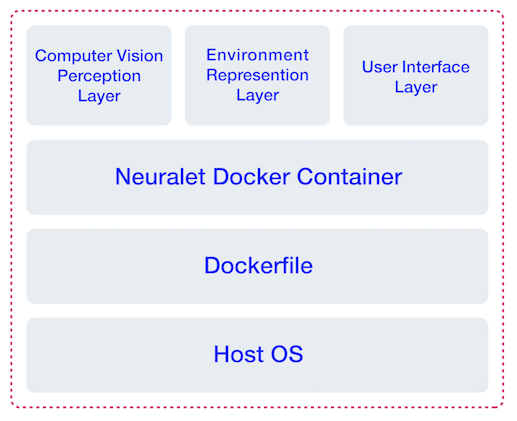
In this section, we discuss our codebase structure and explain the main idea of each module. We highly recommend you to study this part thoroughly if you want to contribute or customize the behavior of the software for your specific application. In case you want to use the software as it is, you can skip this section.
At a high level, our approach consists of three main layers, 1- Computer vision perception layer, 2- Environment representation layer, 3- User interface layer. Below, we will discuss each layer in more detail.
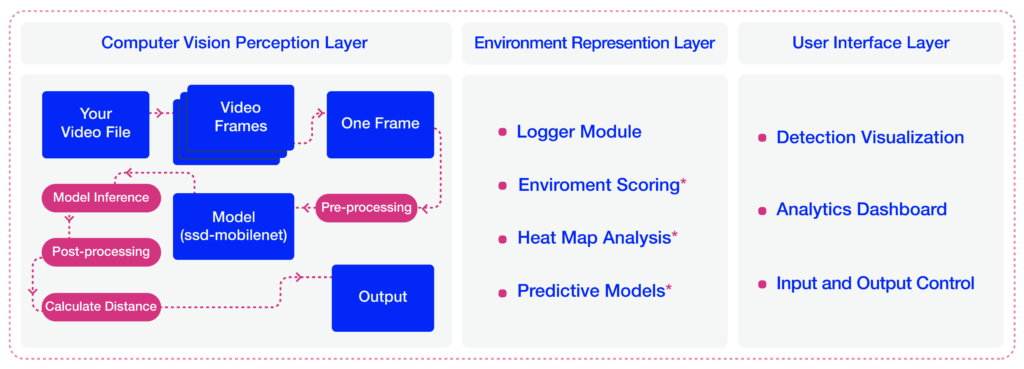
4.1. Computer Vision Perception Layer
The computational core of this application lies in this module. The Distancing class in the libs/Core.py
We will now discuss the primary building blocks of the Distancing class.
Data Pre-Processing
To prepare each frame to enter the object detection model, we applied some pre-processing such as re-sizing and RGB transformation to the frames.
resized_image=cv.resize(cv_image,tuple(self.image_size[:2]))
rgb_resized_image = cv.cvtColor(resized_image, cv.COLOR_BGR2RGB)
Model Inference
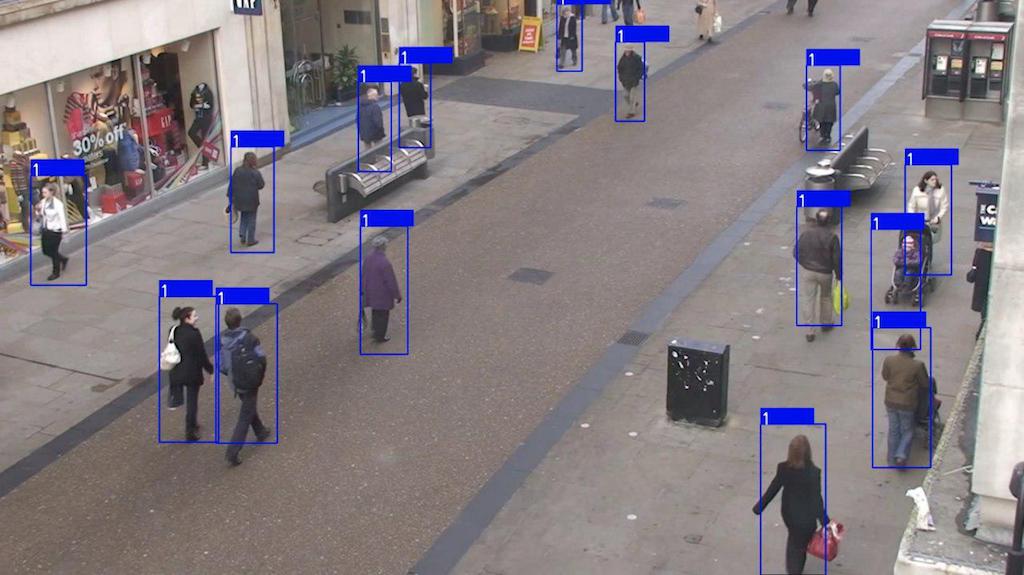
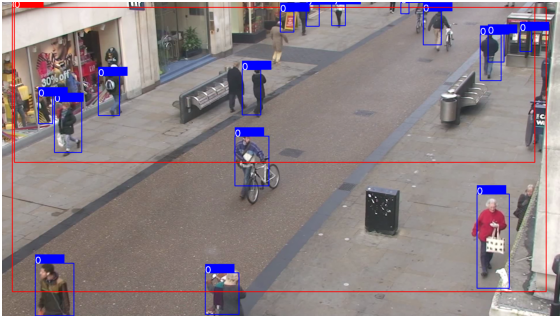
In the constructor, we have a detector attribute that specifies the object detection model. We used SSD-MobileNet-V2 trained on the COCO dataset as the default model for this application. A screenshot is depicted in Figure 2, showing the SSD-MobileNet-V2 model inference on a Jetson Nano device.
We have trained the Pedestrian-SSD-MobileNet-V2 and Pedestrian-SSDLite-MobileNet-V2 networks on the Oxford Town Centre dataset to perform pedestrian detection using the Tensorflow Object Detection API. You can change the Name parameter in the config file under Detector settings to specify the network you want to work with.

The object detection model is built based on the config file and should have an inference method that takes a proper image as input and returns a list of dictionaries. Each dictionary of this list contains the information of a detected object, i.e., bounding box coordinates and object id.
tmp_objects_list = self.detector.inference(rgb_resized_image)
We experimented with different models on both Jetson Nano and Coral Dev Board devices. See Table 1 for more details.
| Device Name | Model | Dataset | Average Inference Time [ms] | Frame Rate [FPS] |
|---|---|---|---|---|
| Jetson Nano | SSD-MobileNet-V2 | COCO | 44 | 22 |
| Coral Dev Board | SSD-MobileNet-V2 | Oxford Town Centre | 5.7 | 175 |
| Coral Dev Board | SSD-MobileNet-V2-Lite | Oxford Town Centre | 6.1 | 164 |
Bounding Boxes Post-Processing
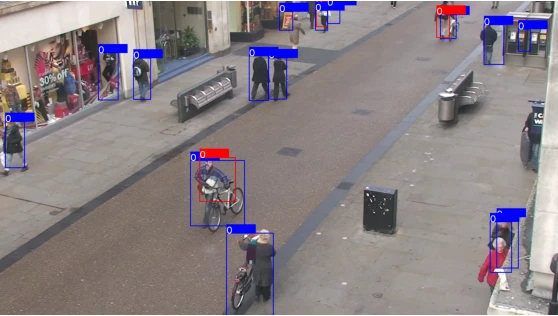
There are some reasons to apply post-processing techniques to the detected bounding boxes. First, since we are using a general-purpose object detection model trained on COCO with 80 different classes, including pedestrians, there are some false positive outputs for the pedestrian detection task. These false positives are often seen in the form of extra-large boxes (Figure 3) or duplicate boxes specifying a single object (Figure 4). In the following lines of code, we address these two problems by filtering large and duplicate boxes:
new_objects_list = self.ignore_large_boxes(objects_list)
new_objects_list = self.non_max_suppression_fast(new_objects_list,
float(self.config.get_section_dict("PostProcessor")["NMSThreshold"]))
The second reason to apply post-processing is to track objects smoothly. In the absence of post-processing, the object detection model may lose track of the detected pedestrians from one frame to the other. This issue can be solved by designing a tracker system that follows the detected pedestrians in different frames.
tracked_boxes = self.tracker.update(new_objects_list)
Calibration-less Physical Distance Measurement
After post-processing, we need to calculate the real-world distances between every two persons detected in each frame. This application specifies each detected person by drawing a bounding box around them. Therefore, the problem can be restated as follows: How can we measure the distance between two bounding boxes?
There are a few methods to calculate the distance between two rectangles; however, choosing the right approach to measure this distance depends on different specifications, such as the data characteristics and the camera angle. Since some measures, such as the distance between the camera to the center of the bounding boxes or the depth data, are not available in most cases, we implemented a calibration-less method by making a few assumptions. This method gives us a reasonable estimate of the real-world distance between the people. However, it is less accurate compared to other approaches that require additional input data.
In this approach, we map the distances in the image (in pixels) to physical distance measures (in meters), by assuming that each person is H = 170L1, L2, L3, L4
1- Assume that L = L1 = L2 = L3 = L4 approximately.
2- Assume that L = min (L1, L2, L3, L4).
Following the first assumption makes the approach easier to understand with less amount of calculations needed. However, the second method produces more accurate results.
We explain how to calculate L1 in this section. If you want to use the first method, put L = L1. Otherwise, calculate L by setting it equal to the minimum value of L1 through L4. It is trivial that you can calculate L2, L3, and L4 following the same approach.
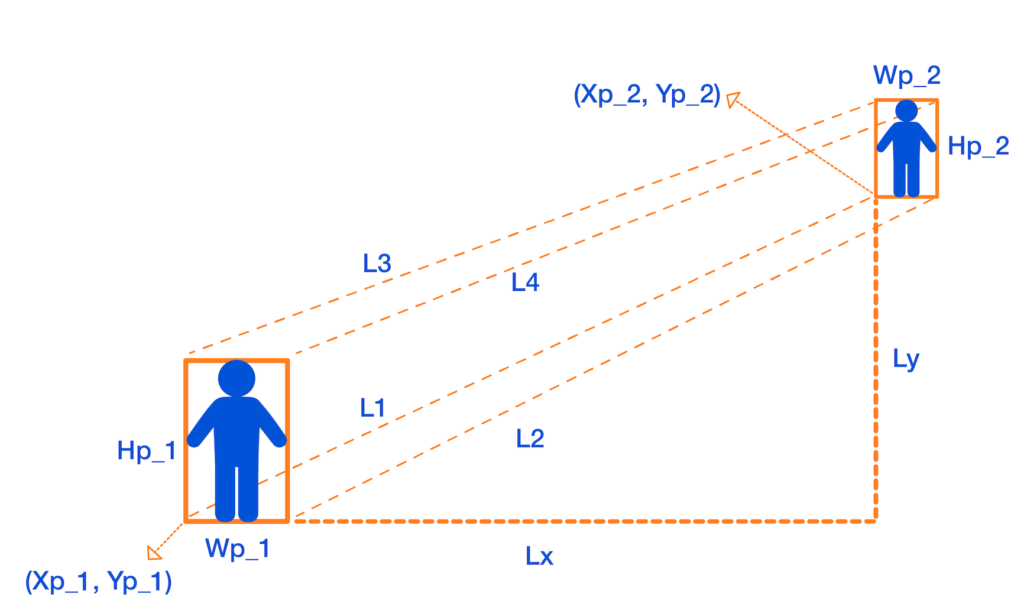
To measure L1, we first calculate the horizontal and vertical distances between person 1 and person 2 in pixels, which are denoted as DX and DY:
DX = p1x1 – p2x1,
DY = p1y1 – p2y1
Then, by the H = 170 cm assumption, we map the distances in pixels to distances in centimeters:
Lx = DX * ((1 / H1 + 1 / H2) / 2) * H,
Ly = DY * ((1 / H1 + 1 / H2) / 2) * H
Finally, we apply the Pythagorean formula to get L1:
L1 = sqrt(Lx2 + Ly2)
We can now calculate L based on our initial assumption, which is a reasonable estimate of the physical distance between two people.
Configurations
You can set the DistMethod CenterPointsDistanceFourCornerPointsDistance to calculate L as the minimum value of the distances between all four corners of the two bounding boxes (L = min (L1, L2, L3, L4)).
The minimum physical distancing threshold is set to 150 centimeters by default. You can set a different threshold for physical distancing by changing the value of DistThreshold
4.2. Environment Representation Layer
This layer is responsible for storing and representing the information that can give the user insights into different social distancing measures, such as the overall safety score, the number of people in the space over the past day, and total risky behaviors. Implemented modules and tools are explained below.
Logger Module
The logger’s update method creates two log files: the object log file and the distance log file. These log files are stored into two different subdirectories of the main log directory. The log directory can be modified by changing the LogDirectory parameter in the config file. You can also customize the TimeInterval setting in the config file to adjust the frequency of the log file updates.
The two log files store different kinds of information. The object log keeps track of the information about all the detected objects in each frame. Frame number, person id, and bounding box coordinates are stored in this log file. The distance log stores the details of physical distancing violation incidents, such as the frame number in which physical distancing rules are violated, the id of the persons who are crossing the distance threshold, and the distance they are standing from each other.
You can create your own logger module by implementing a customized update method.
Environment Scoring
Environment score is an index defined to evaluate how well social distancing measures are being practiced in an environment. Two different formulas are implemented to measure the environment score in the following functions:
1- The mx_environment_scoring
env_score = 1 - np.minimum((violating_pedestrians / MAX_ACCEPTABLE_CAPACITY), 1)
Note that MAX_ACCEPTABLE_CAPACITYDistThresholdMAX_ACCEPTABLE_CAPACITY
2- The mx_environment_scoring_consider_crowd
env_score = 1 - np.minimum(((violating_pedestrians + detected_pedestrians) / (MAX_CAPACITY + MAX_ACCEPTABLE_CAPACITY)), 1)
In this formula, the MAX_CAPACITY
Note that in both formulas, the environment score takes a value between 0 to 1, and the more violating cases appear in a frame, the less the environment score of that frame becomes.
4.3. User Interface (UI) Layer
The UI layer provides an abstraction that enables web-based UI as well as other forms of UI to interact with the main system. The WebGUI object implements a Flask application and serves as an interface for the user. The WebGUI
Processing the video begins with the WebGUI start process_videoupdate method of the WebGUI
Analytics
On the output view, some data visualizations are provided to give the user better insights into how well physical distancing measures are being practiced. The data analytics and visualizations can help decision-makers identify the peak hour, detect the high-risk areas, and take effective action to minimize social distancing violations.
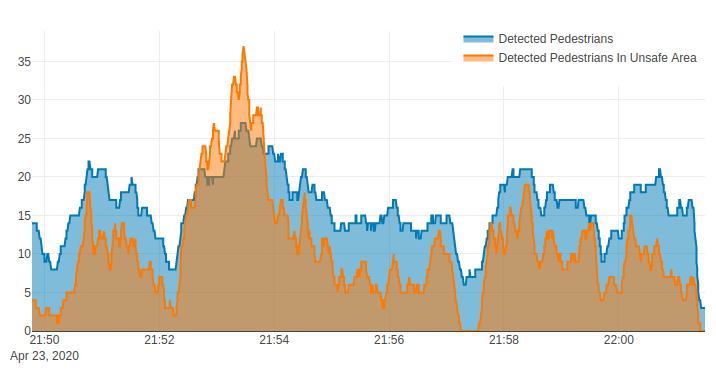
Pedestrian plot:
This plot (see Figure 7) shows the total number of detected pedestrians (the blue graph) and the number of detected pedestrians who are violating the physical distancing threshold (the orange graph) over time.
Environment Score Plot:
This plot (see Figure 8) shows the environment score over time to give users a better understanding of how physical distancing measures and guidelines are being practiced. As mentioned earlier, the higher the score, the better.

5. Running the Social Distancing Application
Follow the instructions below to start running the application on your device.
5.1. Config File
The user can interact with the code by changing some parameter values in the config file. Some parameters might need modifications to meet the user’s specific purposes. To run our application on a video file of your choice, set the VideoPathConfigEngine
5.2. Docker Container
After customizing the config file, you can run the web application by running the Docker container and seeing the output in your browser.
Note that you should have Docker installed on your device.
The Docker container executes the neuralet_distancing.pyHOST_PORT
Jetson Nano
Set up your device
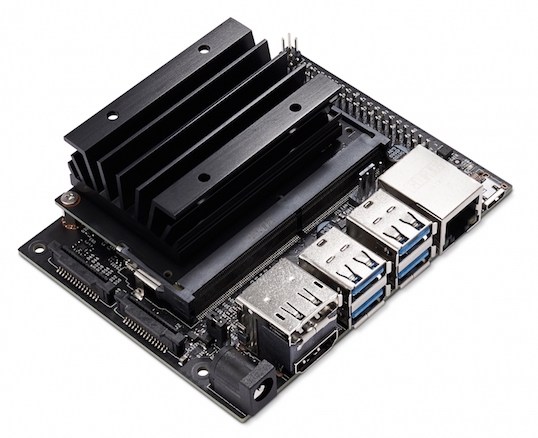
Jetson Nano Developer Kit (Figure 10) is NVIDIA’s small and high-performance edge product that enables you to run a wide range of machine learning and deep learning applications.
To run this application, you require to set up your Jetson Nano using JetPack 4.3 and have Nvidia-docker runtime available. Follow Getting Started With Jetson Nano Developer Kit and How to Install JetPack tutorials to get your device ready.
Docker Container
Use the following code to build the Docker image and run the container on your Jetson Nano.
cd neuralet/applications/smart-distancing/

# 1) Download TensorRT engine file built with JetPack 4.3:
./download_jetson_trt.sh

# 2) build Docker image:
docker build -f Dockerfile-jetson-nano -t “neuralet/social-distancing:jetson-nano” .

# 3) run Docker container:
docker run -it –runtime nvidia –privileged -p HOST_PORT:8000 -v /PATH_TO_CLONED_REPO_ROOT/:/repo neuralet/social-distancing:jetson-nano
Edge TPU
Set up your device
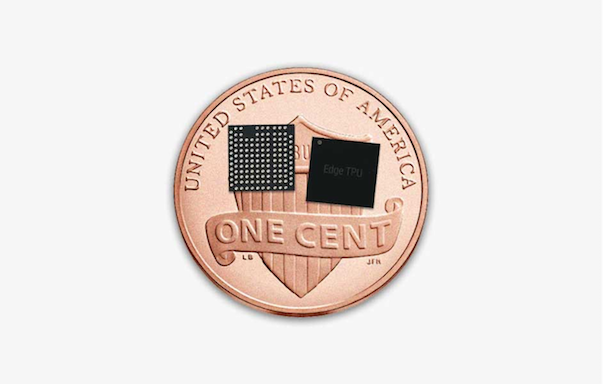
Google’s Edge TPU (Figure 11) is a fast, small, and high-performance ASIC that provides machine learning inferencing for low-power devices. Multiple products by Google include the Edge TPU built-in, such as Coral Dev Board and Coral USB Accelerator.
You can follow Google’s official getting started tutorials to set up your device.
Coral Dev Board getting started tutorial
Coral USB Accelerator getting started tutorial
Docker Container
You can use a Coral Dev Board or an AMD64 node with the attached Coral USB Accelerator to run this application. Make sure you have set up the device correctly before proceeding to the next step. Follow the instructions below to build the Docker image for your device and run the Docker container.
1- Coral Dev Board
Docker can be installed on the dev board following these instructions:
cd neuralet/applications/smart-distancing/

# 1) build:
docker build -f Dockerfile-coral-dev-board -t “neuralet/coral-dev-board:applications-smart-distancing” .

# 2) run:
docker run -it –privileged -p HOST_PORT:8000 -v /PATH_TO_CLONED_REPO_ROOT/:/repo neuralet/coral-dev-board:applications-smart-distancing
2- AMD64 node with attached Coral USB Accelerator
Install Docker on your AMD64 node with the attached Coral USB Accelerator using the instructions below:
cd neuralet/applications/smart-distancing/

# 1) build:
docker build -f Dockerfile-amd64-usbtpu -t “neuralet/amd64:applications-smart-distancing” .

# 2) run:
docker run -it –privileged -p HOST_PORT:8000 -v /PATH_TO_CLONED_REPO_ROOT/:/repo neuralet/amd64:applications-smart-distancing
6. Smart Social Distancing Roadmap
This project is under substantial development. Your feedback helps us improve the application performance and add other exciting features. We are currently working on the items below.
– Evaluate and benchmark different models. Improve the physical distance calculation module by adding more complex geometric constraints.
– Enhance the environment representation layer by adding a bird’s-eye view panel and social distancing heatmap.
– Many UI/UX improvements.
– Ability to re-train and fine-tune models for each scene.
Share your experience with the community
Please email us at hello@galliot.us if you have used this application in practice at your office, your warehouse, or any other place. We like to share your experience with the community and help others implement it as well.
Please visit our website for more information and subscribe to our newsletter to receive the latest news and updates about our products. Don’t forget to check out our GitHub page for other models and applications.
Neuralet Webinar Series – Edge DevOps
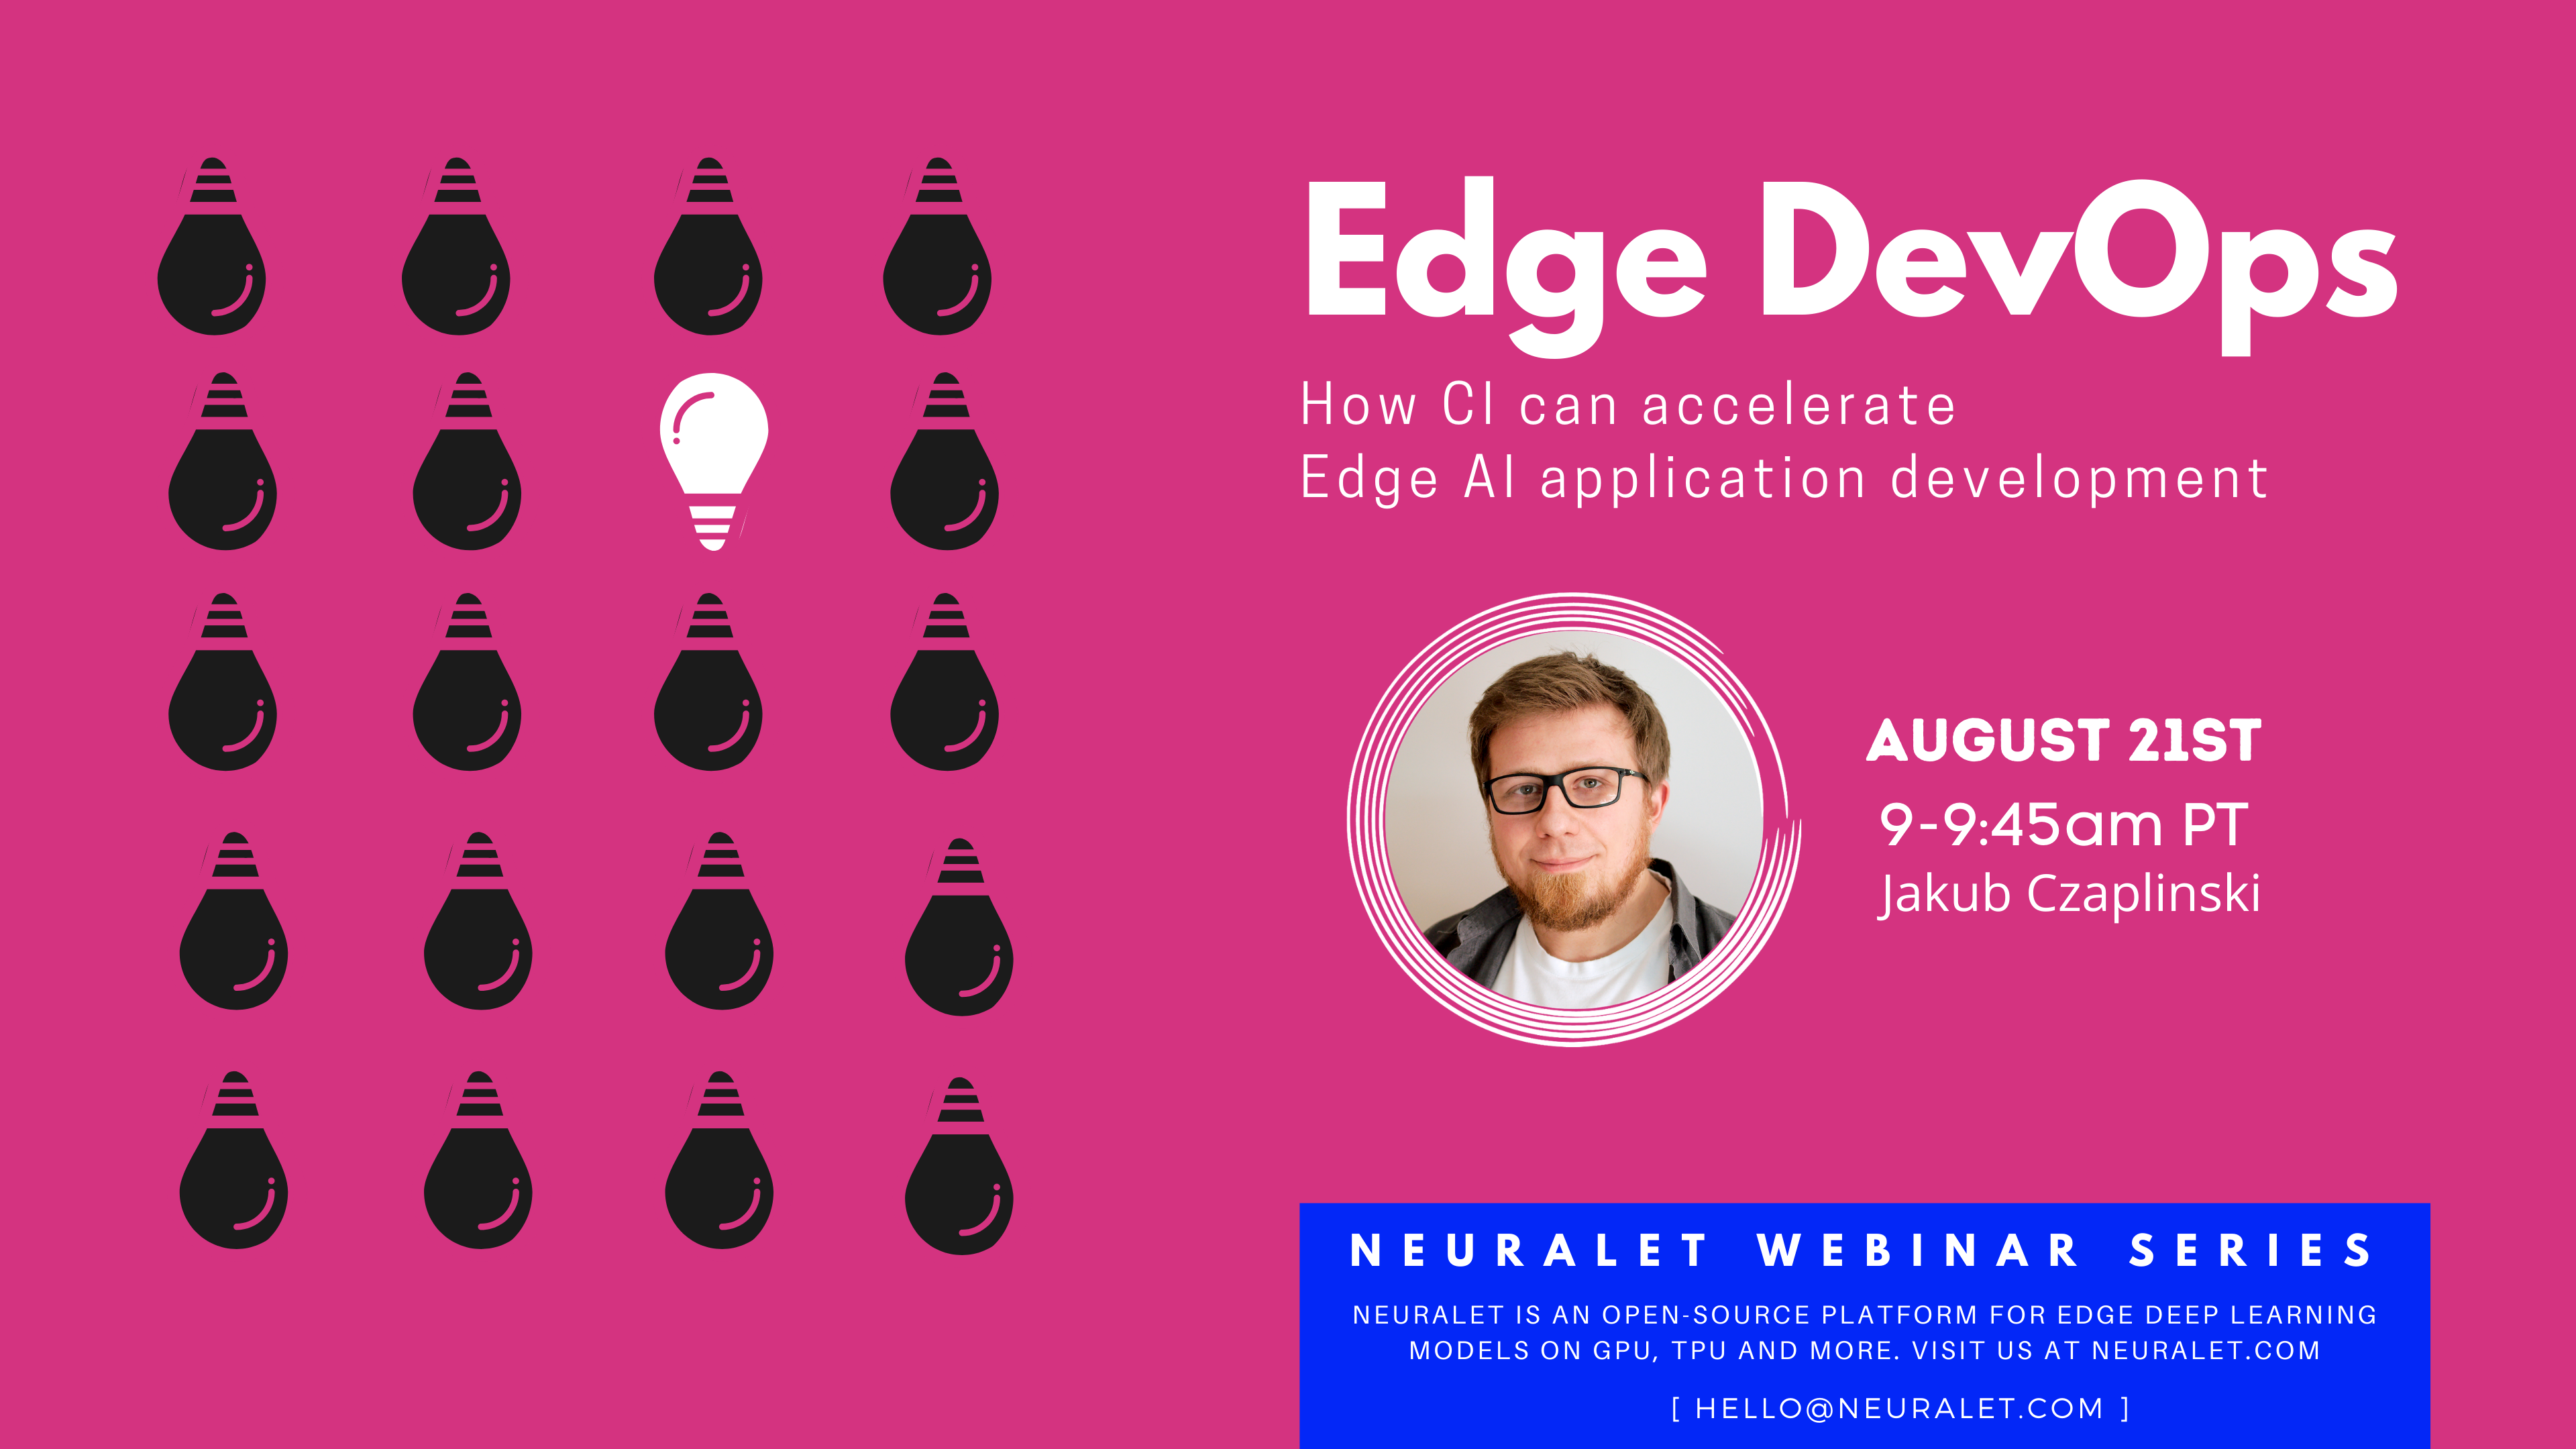
Edge DevOps Webinar
Edge DevOps Webinar – How Continuous Integration can accelerate Edge Machine Learning application development.
At Neuralet (our Artificial Intelligence and Deep Learning engine), we have scheduled a series of webinars on Edge AI and Machine Learning. The first topic we will cover is Edge DevOps. In this webinar, Jakub Czapliński would go over how Continuous Integration can accelerate Edge AI application development. Jakub is a seasoned software architect, and he has been involved in a handful of CI/CD implementation projects over the past few years. Join our Webinar on Friday, August 21st – 9:00 – 9:45 AM PT. Click the link below to register for our Zoom Webinar: This webinar has been finished.