Month: October 2020
Pose Estimation on NVIDIA Jetson platforms using OpenPifPaf

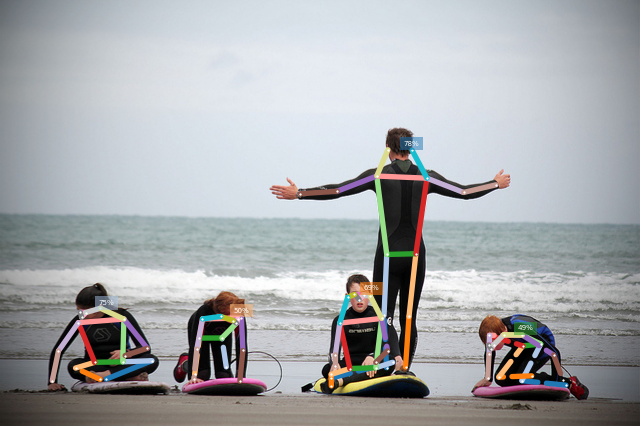
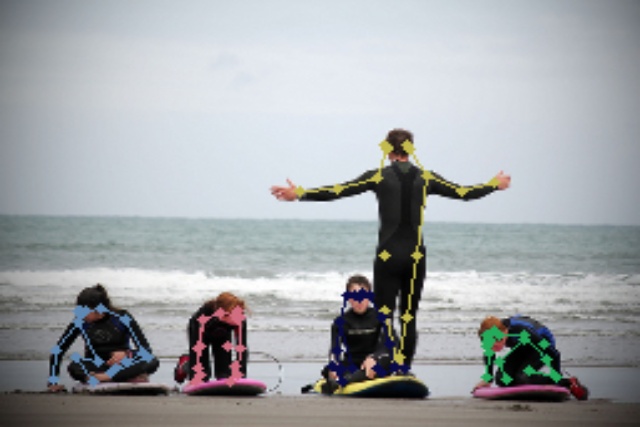
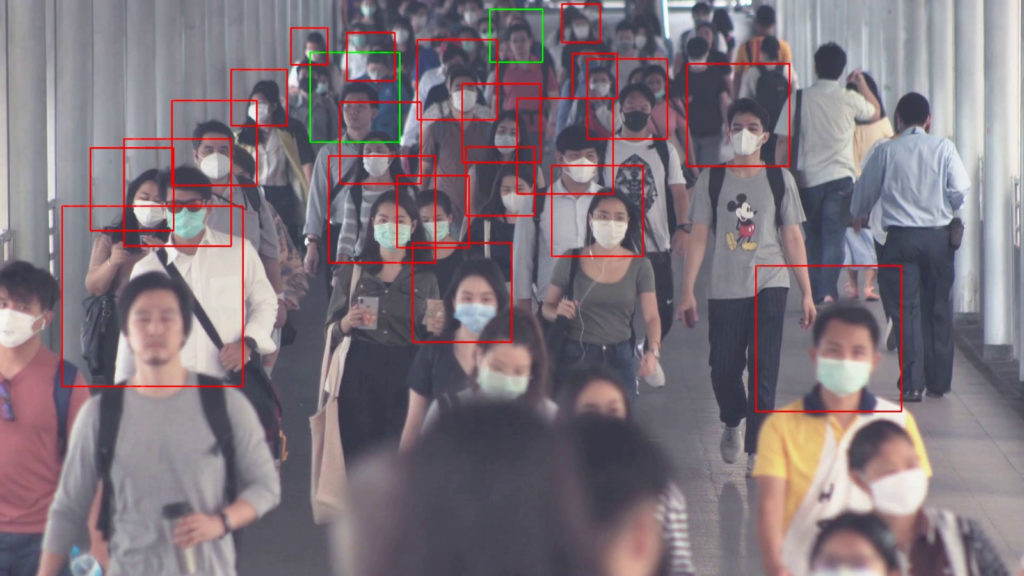
Figure 1. Pose Estimation output on NVIDIA Jetson TX2 using OpenPifPaf.
In this post, we will walk through the steps to run an OpenPifPaf Pose Estimation model on NVIDIA Jetson platforms.
This is the first chapter of our work on Human Pose Estimation. Following are some useful links to explore:
Galliot’s GitHub Repository for this work.
If you don’t know about pose estimation refer to Overview of Human Pose Estimation with Deep Learning.
Introduction to Galliot edge-device-friendly Pose Estimator, TinyPose.
An overview of the Data Labeling Methods, Challenges, and Solutions.
Pose Estimation is a computer vision technique that detects body posture, i.e., the human body’s spatial configuration, in videos or images. Pose estimation algorithms estimate body pose using a set of KeyPoints that indicate key body joints, such as elbows, knees, and ankles.
In this post, we will walk through the steps to run pose estimation on NVIDIA Jetson platforms. Jetson devices are small, low-power AI accelerators that can run machine learning algorithms in real-time. However, deploying complex deep-learning models on such devices with limited memory is challenging. In this case, we need to use inference optimization tools, such as TensorRT, to be able to run deep learning models on these platforms on edge devices.
In this work, we generated a TensorRT inference engine from a PyTorch pose estimation model to run pose estimation on Jetson platforms in real-time. Our model can work well on real-world CCTV data compared to the existing models.
The source code, models, and Dockerfiles introduced in this blog are available for download.
1. Pose Estimation on Jetson Devices; where to start?
To run pose estimation, we searched for and deployed different pre-trained pose estimation models on Jetson devices. Several open-source models were available for pose estimation to experiment with. Let us explain more about a few of them:
1.1. TensorRT Pose Estimation
TRTPose is an open-source project for real-time pose estimation accelerated with TensorRT. Two pose estimator models pre-trained on the COCO dataset are available for download on this repo.
Since the models are accelerated with TensorRT, it was straightforward to deploy them on Jetson devices. We tested both pre-trained models on different sets of data on Jetson Nano, and the densenet121_baseline_att_256x256_B model achieved the best performance with a frame rate of 9 FPS.
As you can see in the example images below, the model worked well on images where people were standing close to the camera (Figure 2). However, it failed to generalize well to real-world CCTV camera images, where people occupy only a small portion of the image and partially occlude each other (Figure 3).
Since we wanted to run inference on real-world CCTV camera images and there was no TensorRT model available that could work properly with CCTV data, we had to create one from scratch. So, we moved to the next approach.
1.2. OpenPifPaf
OpenPifPaf is the official implementation of a paper titled “PifPaf: Composite Fields for Human Pose Estimation” by researchers at the EPFL VITA lab. According to the paper, it “uses a Part Intensity Field (PIF) to localize body parts and a Part Association Field (PAF) to associate body parts with each other to form full human poses.” Here is a sample image of how OpenPifPaf works:
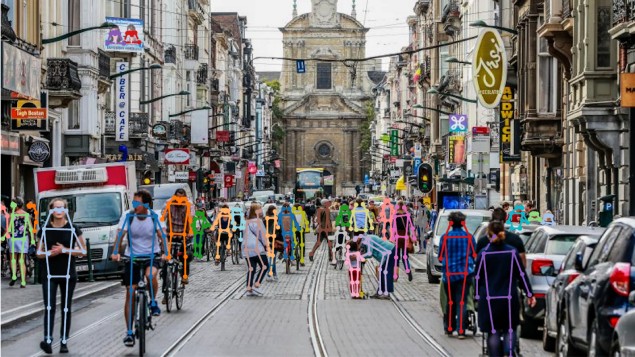
Since OpenPifPaf is optimized for crowded street scenes, it works well on CCTV frames (Figure 1) as well as images captured from a close distance (Figure 6). Therefore, we continued working with OpenPifPaf to run pose estimation on real-world CCTV data.
2. Deploying OpenPifPaf pose estimator on Jetson platforms
Since the official OpenPifPaf repository uses PyTorch Framework, we applied the steps in Figure 5 to optimize the OpenPifPaf model to be able to run it on Jetson devices.

Figure 5. Deploying a PyTorch model On Jetson Device steps
1- Train a PyTorch Model:
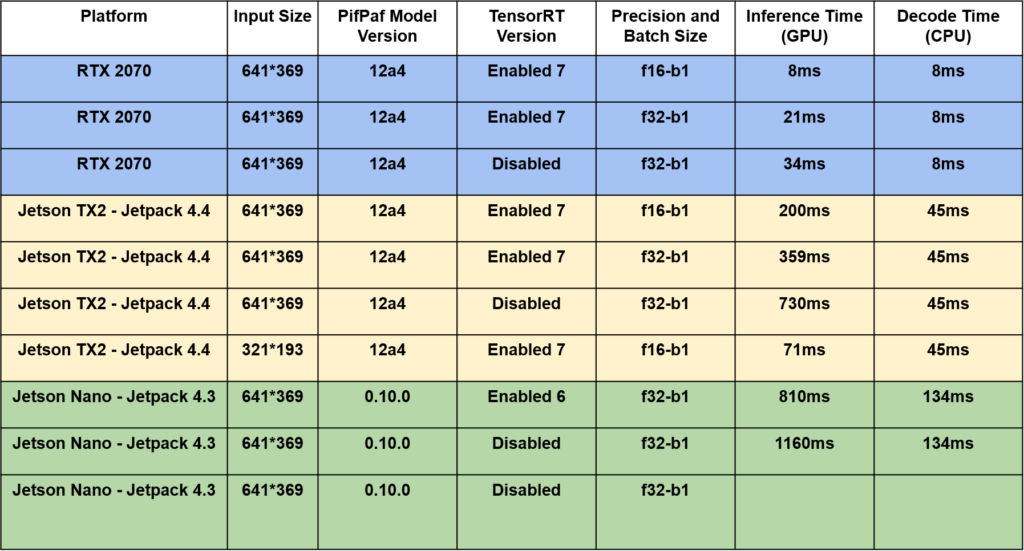
For the first step, we used the pre-trained model of OpenPifPaf version 0.12a4 for TensorRT version 7 and OpenPifPaf version 0.10.0 for TensorRT version 6.
2- Export an ONNX model from the PyTorch model:
We have used ONNX (stands for Open Neural Network Exchange) as an intermediate (go-between) format to convert different deep learning models that are trained on various frameworks. We have utilized the `export_onnx` module of OpenPifPaf to export an ONNX model from the OpenPifPaf Pytorch model for this step. We had got some errors by running that module on Jetson Platforms, so we exported two ONNX models with different input sizes on an X86 device from OpenPifPaf version 0.12a4 and uploaded them on Galliot-Models to be available for download from Jetson devices.
3- Generate a TensorRT Engine from the ONNX model:
It is required to generate a TensorRT Engine in the third step for executing high-performance inference on Jetson devices. TensorRT achieved the optimization by converting the model to FP16 (16-bit floating point) or INT8 (8-bit integer) instead of the usual FP32. However, it causes a slight decrease in accuracy; it still yields significant improvements to inference time speed, performing some hardware-specific transformations and modifying model architecture to speed up the inference time. We used the ONNX parser from ONNX-TensorRT project tag 7.0 to build a TensorRT engine with Jetpack 4.4 (TensorRT 7.1.3).
4- Run inference from the TensorRT Engine:
After building the TensorRT inference engine, we prepared the inference code. The inference code consists of a pre-processing module, an inference module, and a post-processing module. We pre-processed the data by applying normalization, ran inference using this inference module, and customized the OpenPifPaf post-processing module to decode the model output.
The inference module consists of the following steps:
1- Allocate buffers for inputs and outputs in the GPU.
2- Copy data from the host to the allocated input buffers in the GPU.
3- Run inference in the GPU.
4- Copy results from the GPU to the host.
5- Reshape the results
We have gathered all the required packages, frameworks, and codes of the above-mentioned steps in a Dockerfile to be easily used to run our optimized OpenPifPaf-TensorRT Pose-Estimation on a Jetson board that has Jetpack 4.4 installed.
Technical Note: Input Size Matters
We exported two ONNX models with different input sizes from OpenPifPaf version 0.12a4, the smaller one with (321,193) input size and the larger one with (641, 369) input size.
The network with the smaller input size worked well on images containing larger objects but failed to generalize to CCTV-like data. This model consumed less inference time and was faster than the other model.
However, the other network worked great on images containing smaller objects, like CCTV images with small objects. It also did well on images with larger objects, but this model was slower than the previous model.
We continued working with both models to implement each one for its specific use case.
We have tested our OpenPifPaf-TensorRT application on a surveillance video on RTX 2070, Jetson TX2, and Jetson Nano which you can see the results in Table 1.
As you can see, this model works great with images captured from a close distance to the subject as well as real-time CCTV images.
This is the first time that the OpenPifPaf, which is a complex and heavy model, has been deployed on Jetson devices.
3. Conclusion
Deploying complex deep-learning models on edge devices with limited memory is challenging. In this post, we have explained how we couldn’t find a well-trained pose estimation model on CCTV cameras for Jetson devices and described the challenges we have faced in going through the process and solving the problem. Accordingly, we came up with a solution that, to the best of our knowledge, is the only pose estimation model deployed on Jetson that works well on CCTV images.
Moreover, we tried to walk through the steps to run pose estimation on Jetson platforms by building a TensorRT inference engine from an OpenPifPaf PyTorch model. In future works, we aim to optimize the pose estimation model to achieve higher inference speed to run pose estimation on input videos in real-time.
It is worth mentioning that we have also used this developed model deployed on Jetson for Galliot’s “Smart Social Distancing” and “Face Mask Detection” products.
If you have deployed our OpenPifPaf-TensorRT model on any of your applications, we encourage you to share your thoughts and experiences with us in the comment section at the end of this article. You can also get in touch with us through “hello [at] galliot [dot] us” for further questions.
Real-world Face Mask Detection Part2; A Practical Solution
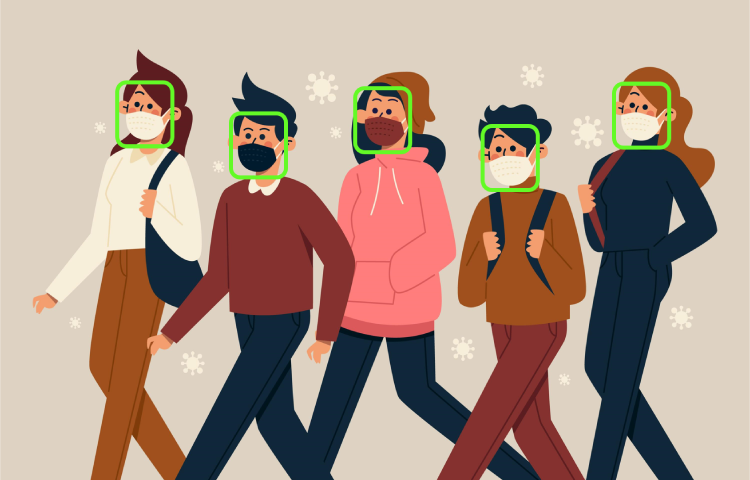
image source freepik.com
In this article, we will walk through the steps for building a face-mask detector to detect faces in real-world CCTV videos captured in crowded areas.
This is the second part of a two-part series on real-world face mask detection by Galliot.
Find the first part of this article here to read about the Mask Detection problem statement.
Go to Galliot’s Face Mask Detector source code for implementation details.
Visit the Data Labeling Methodology, Approaches, and Challenges article to know more about building high-quality data for your AI applications.
As a response to COVID-19, we have designed and developed an open-source application, sponsored by Lanthorn.ai, that can detect if people are wearing a face mask or not. This application works well even in videos captured from crowded areas. Our system can detect face masks in real-world CCTV camera videos, where faces are blurry, low-resolution, and only occupy a small portion of the video frame.
To the best of our knowledge, our work outperforms previous works on face mask detection in CCTV video streams. We have open-sourced Galliot’s datasets and models to facilitate continued work in this space. You can learn more about the datasets and models by reading the first part of this article.
In the first part of this article, we explained how to build a face mask classifier that can work in real-world video streams to classify masked faces from unmasked ones. In this part, we will walk through the steps required to build a face detector to detect faces in real-world CCTV videos captured in crowded areas. We will also explain how to deploy Galliot’s Face Mask Detector on edge devices and give examples of the source code configuration options.
If you plan to build a face detector, you can keep reading this article even if you have not read part 1. However, we recommend you read part 1 first to better understand the basic concepts and the goal of this application.
1. Overview of the Mask Detection Problem
We discussed the problem in detail in part 1. Here is a quick recap:
We wanted to design a system that could detect faces and classify masked faces from unmasked ones. We divided our face mask detection system into two sub-modules: 1- the face detector and 2- the face mask classifier. Part 1 covers the face mask classifier sub-module in detail. In this part, we will expound on the face detector.
Before designing and building the detector model, we need to know the characteristics of the data we are going to deal with.
There are several face mask detectors out there that fail to generalize to real-world data. By real-world data, we mean videos recorded by cameras placed far from the objects of interest, such as CCTV camera videos. Capturing the features of objects is challenging in these videos, compared to high-resolution webcam videos where objects of interest are positioned close to the camera. Our goal is to detect faces and classify masked faces from unmasked ones in real-world data, like the videos captured by CCTV cameras, where faces are small, blurry, and low-resolution.
2. Face Detection in Real-World Data; An Evolutionary Path
We tried several face detector models to find the one that matched our use case. This section will explain some of these detector models and describe each one’s characteristics.
2.1. Model #1: SSD MobileNet
When dealing with an object detection problem, the most popular networks to use are R-CNN family models, YOLO family models, and SSD models. We decided to start with a MobileNet SSD model for its high speed and ease of deployment on mobile devices.
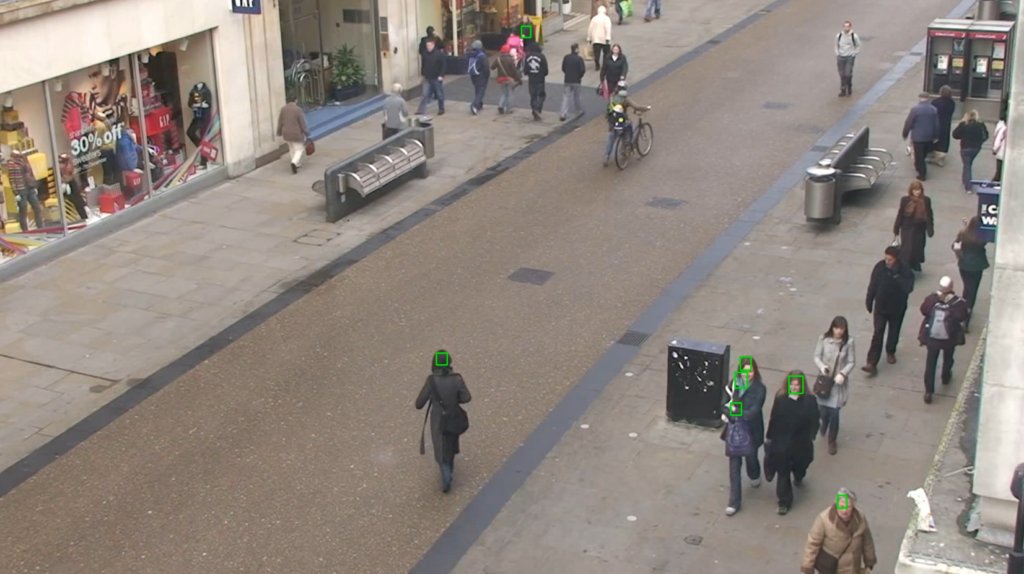
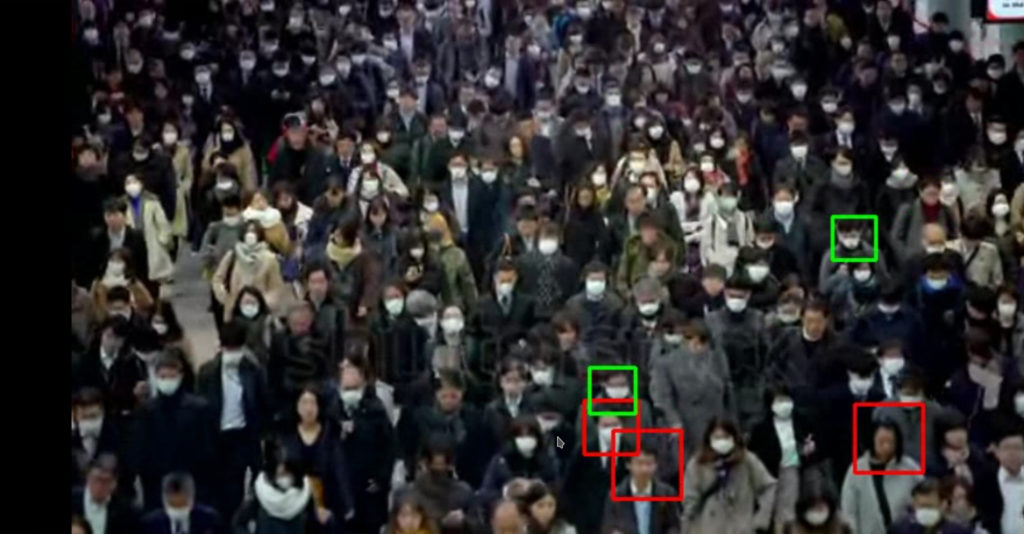
We trained an SSD-MobileNet-V1 model on WIDER FACE, a face detection benchmark dataset, to build our first face detector model. The model performed well on its validation set; however, when we tested the model on real-world CCTV data, it failed to detect small faces (see Figure 1).
Why does SSD fail to detect small objects?
Let us first discuss the performance of some state-of-the-art object detection models on small-sized images:
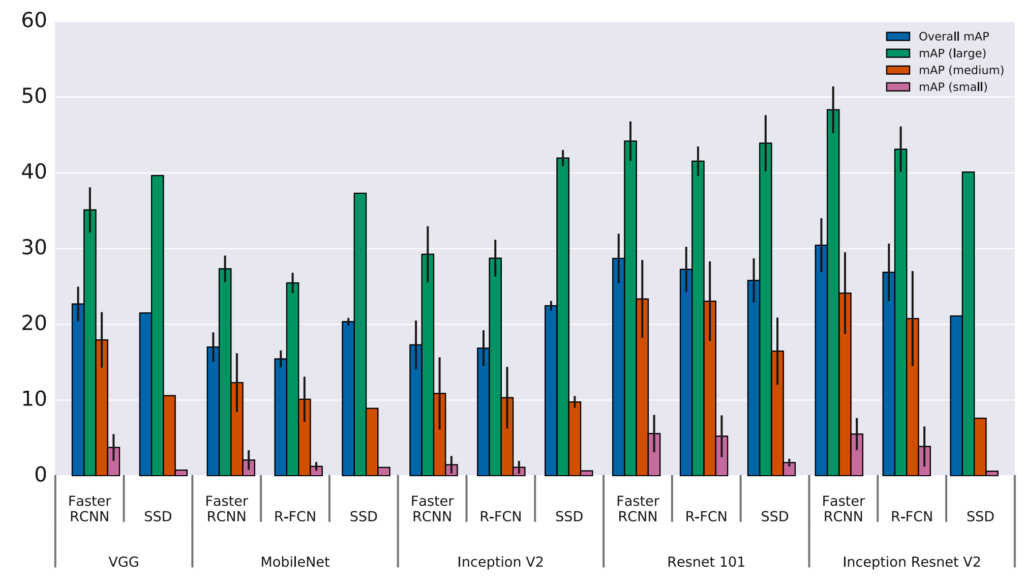
As you can see in Figure 2, all the mentioned object detection architectures struggle with detecting objects in small sizes, and the models do much better when trying to detect large objects. It can be inferred that conventional object detection approaches fail to detect small objects.
Applying SSD is not an excellent approach to face detection where faces are relatively small, and this is a structural problem in SSD (and other anchor-based) methods. There are several reasons why SSD misses the small faces. We will mention two of them; you can follow other reasons in this paper.
Few features
Larger objects include more pixels; therefore, more features can be extracted from them. In other words, the model can learn more attributes when dealing with larger objects that contain more pixels with various information about each pixel’s color, texture, and shape. However, few features are learned by the network when working with small objects, and most of these learned features are faded and destroyed in the last layers, especially in deep networks with several layers.
Mismatch
Anchor-based approaches, like SSD, propose several anchors with fixed aspect ratios and scales to do the object detection task. However, the anchor scales are too large to fit the small faces. Therefore, anchor-based approaches fail to detect small objects, in our case, small faces.
We learned that SSD methods are not suitable for detecting small objects. In our next attempt, we pursued a completely different approach to detecting faces; we used a pose estimation model.
2.2. Model #2: Pose Estimation
We explained that small faces have few features to be learned. A richer context was needed to solve the problem of detecting small faces. We tried to look at the problem from a different angle and finally decided to use pose estimation.
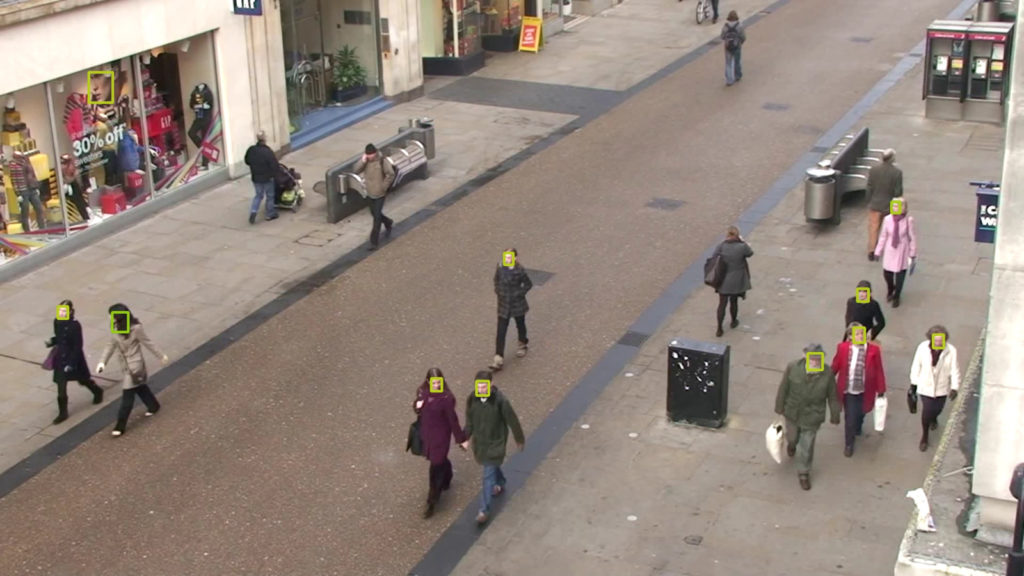
Pose estimation algorithms extract rich information about the human body parts. These algorithms predict the location of key body joints, such as elbows, shoulders, and knees, known as the key points, as shown in Figure 3. Pose estimation algorithms leverage much more context about the whole human body instead of focusing on learning features about the face only. By knowing these key points, we can easily estimate the face bounding box coordinates. For example, the face bounding box width can be approximated as one-third of the shoulder width.
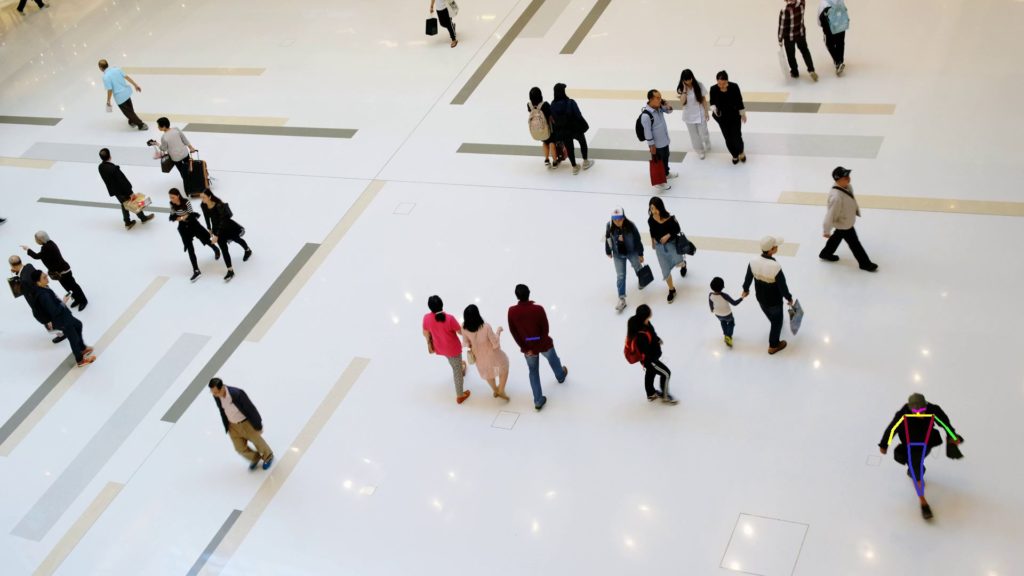
We tried different pose estimation models to predict the body key points, including OpenPose, AlphaPose, and OpenPifPaf. OpenPifPaf is specially designed for pose estimation in videos where bodies may be partially occluded, and bodies are small. It also gave the best performance results on real-world CCTV data, among other pose estimators. Thus, we continued working with this model. Figure 4 shows an example of face bounding boxes calculated using the body key points predicted by the OpenPifPaf pose estimator.
OpenPifPaf works pretty well on videos where people are far from the camera, and the faces are small. However, there were some cases where the pose estimation method missed some faces, regardless of the model we used.
Pose estimation models can predict key points where the whole body, or at least most of it, is visible in the input image or video. However, in some overcrowded areas, most of the pedestrians are occluded by each other. Hence, the bodies are not visible to the pose estimator, and key points cannot be extracted to further be used by our bounding box calculator algorithm to predict the face bounding boxes.
Figure 5 shows how the pose estimator method works in an overcrowded place. As you can see, the model missed most of the faces. We cannot blame the model for not making face bounding box suggestions, though, as the bodies are not visible to the pose estimator to predict the body poses in the first place.
Based on what we just saw, we cannot conclude that pose estimation methods are not applicable to face detection in real-world, CCTV-like data. In fact, pose estimation methods can produce accurate results in some cases, like what we saw in Figure 4
In the next approach, we will explain our last solution and compare it to our pose estimation method to learn which model we should use in different scenarios.
2.3. Model #3: Tiny Face Detector
The challenge of detecting small faces in overcrowded areas remained unsolved in the previous approach. In this paper, different aspects of this problem are studied, and a novel approach is proposed to train separate detectors for different scales while preserving efficiency. The open-source code for the Tiny face detector is available on GitHub.

We used the Tiny face detector model trained on WIDER FACE and tested this model on several videos. Unlike the previous approach, this method can detect small faces even in overcrowded areas where bodies are almost entirely occluded by each other. Compare the Figure below with Figure 5 to see the model performance in overcrowded areas.

The Tiny Face detector also works well in other scenarios where a few people are passing by. See Figure 8 for an example.
In the last two examples, the Tiny face detector seems to outperform the pose estimation method. However, there are some cases where using the pose estimator is a better choice.
2.4. Identify the Scenario, Choose the Method
Although the Tiny face detector outperforms the pose estimator method in overcrowded scenarios, there are still some cases where the pose estimation method is preferred.
In real-time applications where speed is the priority, pose estimation is favored. We tested both methods on the same video on our GeForce RTX 2070 Super GPU. The inference time was 300 milliseconds per frame for the Tiny face detector, which was three times slower than the 100 milliseconds per frame inference speed using the pose estimation method.
Also, in low-resolution videos with partial occlusions, the Tiny face detector misses some faces that can be detected by the pose estimator.
To sum up, if you are dealing with low-resolution videos where bodies are only partially occluded, and inference speed is important, you would better choose the pose estimation method over the Tiny face detector. However, if you are working with medium to high-resolution videos in overcrowded places where bodies are occluded by each other and inference speed is not important, the Tiny face detector is a better choice.
Note: We will implement the Tiny face detector in our Face Mask Detector application in future updates.
We have learned a lot about building a face detector that works well on real-world data, and from the previous part, we know how to build a “mask/ no mask” classifier. All the necessary tools are ready, so let’s deploy Galliot’s Face Mask Detection application on our edge device.
3. Face Mask Detection on Edge
This section will explain the tools and modules we used to deploy Galliot’s Face Mask Detection application on Edge TPU and Jetson devices. Support is also available for X86 CPU and X86 GPU platforms.
As explained earlier, our application is composed of two sub-modules; 1- the face detector and 2- the “mask/ no mask” classifier. For more information about the connection between these modules, refer to the first part of this article. Next, we will explain the classifier and the detector we used to deploy Galliot’s Face Mask Detection application on each edge device.
3.1. Coral Edge TPU
Face Detector
Coral has introduced an SSD-MobileNet-V2 face detector for Edge TPU devices. However, since the detector is an SSD model, it failed to detect small faces in CCTV-like data (as we discussed earlier). Therefore, we used PoseNet, a pose estimator introduced by Coral, instead. We deployed PoseNet on the Edge TPU device, extracted body key points, and used an algorithm to estimate face bounding boxes according to the coordinates of the extracted key points. PoseNet inference speed for (1281, 721) input size was 18 FPS on a Coral USB accelerator attached to a tower server with an AMD Ryzen 9 3900X 12-Core Processor CPU.
“Mask / No Mask” Classifier
We used the OFMClassifier from part 1 for the “mask/ no mask” classification task. Keras, Edge TPU, and Jetson models are available for download on Galliot’s models’ library. We applied post-training quantization to the Keras model to export a .tflite file. Then, we compiled the TFLite model on the Edge TPU device. The OFMClassifier achieved 90% accuracy on the BaselineVal validation set (introduced in part 1) with 2170 FPS inference speed on a Coral USB accelerator attached to a tower server with an AMD Ryzen 9 3900X 12-Core Processor CPU.
3.2. Jetson Nano and Jetson TX2
Face Detector
None of the pre-existing face detectors and pose estimators deployable on Jetson platforms could accurately detect small faces in CCTV-like images. Therefore, we generated a TensorRT inference engine from an OpenPifPaf pose estimator model for deploying it on Jetson devices. We achieved a 3 FPS inference speed on a Jetson TX2 device. You can download this pose estimator for the Jetson TX2 device here. Support for the Jetson Nano device is coming soon. You can learn more about pose estimation on Jetson platforms in another blog by Galliot, available here.
“Mask / No Mask” Classifier
We generated a TensorRT inference engine from the OFMClassifier Keras model to deploy it on our Jetson device. To do so, we froze the Keras model and converted it to a TensorFlow .pb file. Then, we used the TensorFlow-ONNX tool to convert the .pb file to an ONNX model. Finally, we generated a TensorRT engine from the ONNX model on our Jetson device using the ONNX-TensorRT tool. You can find the OFMClassifier for Jetson Nano and Jetson TX2 here.
We achieved 90% accuracy on the BaselineVal validation set (introduced in part 1) with 219 and 216 PFS inference speed on Jetson TX2 and Jetson Nano, respectively.
4. Face Mask Detection application; how to use the source code?
Galliot’s open-source Face Mask Detection application is accessible on our GitHub repository. You can use this application in several modes by running each command inside Docker:
1. Run a Flask application with a web-GUI interface:
python inference_main_app.py --config configs/config-x86.json
2. Run inference on a single video and save the output in the specified path:
python inference_video.py --config configs/config-x86.json --input_video_path data/video/sample.mov --output_video data/videos/output.avi
3. Run inference on multiple images and save the output in the output image directory:
python inference_images.py --config configs/config-x86.json --input_image_dir data/images --output_image_dir output_images
4. Train the classifier on a custom dataset (currently supported on X86 platforms):
python model_main.py --config configs/config-86.json
Note that you should pass the correct config file according to the device you are using.
The Face Mask Detection application is scalable; you can add your own detector and classifier to the source code and use them instead of the default models. To do so, you should implement the model backbone in the facemask/models/backend.pyfacemask/models/frontend.py
Configurations
You can change the application’s behavior in both inference and training steps by customizing the config file that matches your device. Config file examples for Jetson, Edge TPU, and X86 platforms are available in the application source code on GitHub. We describe config parameters for two common use cases to demonstrate how to customize the configurations. Feel free to experiment with different config parameters to explore more.
Transfer Learning
If you want to use a pre-trained model and apply transfer learning, you will need to make some changes to the config file under the model
- Specify the classifier name using the
backend - Set
load_pretrained - Specify the address of the pre-trained weights using the
pretrained_model
Train a Classifier on a Custom Dataset
If you want to train a classifier on a custom dataset, under the train section:
- Set the
train_image_folder - Specify the directory where you want to save training checkpoints, output model, and TensorBoard logs via the
saved_weights_folder
Note that the structure of the dataset you are using should match this:
#|dataset/
# 	|_train/
# 		|_face
# 			|_face1.jpg
# 			|_face2.jpg
# 		|_face-mask
#      			|_face-mask1.jpg
#      			|_face-mask2.jpg

# 	|_validation/
# 		|_face
# 			|_face1.jpg
# 			|_face2.jpg
# 		|_face-mask
# 			|_face-mask1.jpg
# 			|_face-mask2.jpg
5. Conclusion
In this article, we explained the challenge of detecting small faces in real-world, CCTV-like data. We explored different face detection algorithms, such as SSD MobileNet, Pose estimation, and Tiny face detector, and mentioned the use cases for each face detector. Next, we explained how we deployed Galliot’s Face Mask Detector application on Edge TPU and Jetson devices. Finally, we gave a brief overview of the customizable configurations in the source code.
Galliot’s face mask detection models are available for download on our GitHub repo. Select and download the model according to the platform you are using:
Please refer to Galliot’s Face Mask Detector application source code for implementation details.
License
This project is sponsored by Lanthorn. Visit Lanthorn.ai to learn more about our AI solutions.
All released datasets (Extended Synthetic dataset, Galliot FaceMask50K dataset), released models, and Galliot’s GitHub source code are licensed under Creative Commons Attribution-NonCommercial-ShareAlike 4.0 International License.

Please reach out to us via hello@galliot.us or the contact page if you need to use the datasets, model, or code base for commercial purposes; we are happy to help you!