NVIDIA DeepStream Example; a Face Anonymizer using Python Bindings
A real-world example of DeepStream SDK by Galliot | Face Anonymization
This is the third article in our series on Nvidia DeepStream. So far, we have introduced DeepStream and its basic concepts. Presented here is a real-world example of how you can use this tool to make your own applications.
If you are not familiar with the NVIDIA DeepStream toolkit, we suggest you read this part of our DeepStream articles before you continue on the following content.
You can find DeepStream Face Anonymization Example codes on this GitHub page.
Visit “Adaptive Learning Deployment with DeepStream” for more on this topic.
Read about how you can handle data labeling workflow for building high-quality datasets.
1. Introduction
Smart cities are becoming more practical due to the prevalence of closed-circuit television (CCTV) and monitoring cameras. From supermarkets to schools and subway stations, cameras are being used in smart video analytics and computer vision systems. Intelligent systems play an essential role in monitoring and securing smart cities; however, they cannot be applied to real-world settings due to privacy concerns.
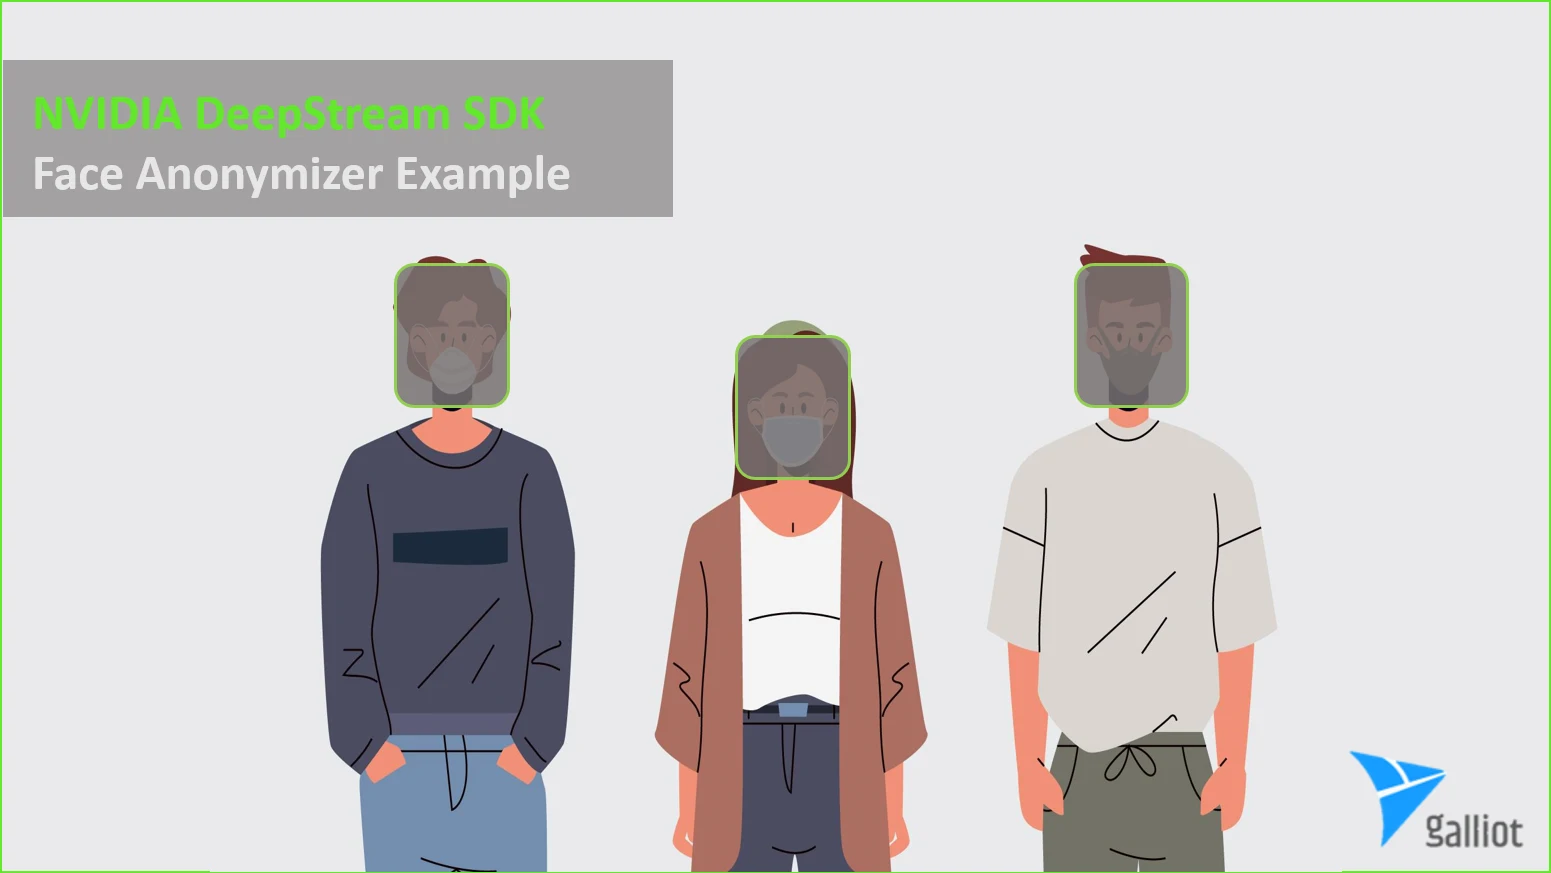
In order to protect people’s privacy, the first thing to do is to remove identifiable information, primarily their faces. Artificial intelligence can detect and cover faces in video frames to comply with privacy-preserving regulations and increase public trust in such surveillance systems. Here we will build and deploy a simple Face Anonymizer on DeepStream to demonstrate how the process works.
This article is intended only to show the capabilities of DeepStream and how it can be used to deploy a simple application. Therefore, this is not a step-by-step guide to building a DeepStream pipeline from scratch. Here, we only highlight the required code for building an anonymizer using DeepStream Python bindings. The full code can be found on our GitHub repository.
2. The Face Anonymizer Pipeline in DeepStream SDK
The first step of deploying an application on Nvidia DeepStream SDK is building a pipeline of the elements. To start with a DeepStream application, you need to create a Gst-Pipeline first. Then you can add and connect various Elements to it, each performing a specific task from loading a source media, processing it, and outputting the result. Go to the “Pipeline and Elements” section of our previous article for more.
In the previous article, we talked about building a DeepStream pipeline and using its Python bindings for further customization. For this article’s Face Anonymizer use case, we created two pipelines each for one of our detectors as well. You can find these pipeline files here and here.
We did not train a face detector from scratch for this article but instead modified ready-to-use object detectors based on COCO’s dataset. These models are trained for general-purpose object detection and do not have face labels. However, they have a person class that localizes the body of the person in a scene.
Here is a quick overview of what we will be covering:
In the first step of the pipeline, we run the object detector on each frame and pick out the person class objects. Then we crop the upper section of each person’s bounding box to get an approximation of the face section. Finally, we anonymize the individuals by putting a dark layout on the approximated faces.
In the following sections, we will describe how to implement these three steps in the DeepStream SDK. First, you should have a pipeline of elements, including an inference element (pgie) for your detector. As a next step, you should register a Probe (Python function) to extract the face bounding boxes and then add layouts to anonymize the faces using the display element (nvdsosd). There are two runner files available in our repository that you can access, one for SSD-MobileNet and one for the YOLO V3 detector.

3. Step one: Object Detection to Catch Persons using DeepStream
As you’ve seen in our repository, there are two runner files for the object detector: SSD-MobileNet and YOLO V3. This application has used these two popular object detection architectures at the beginning of its pipeline.
In DeepStream pipelines, each Neural Network output requires Parsing (post-processing) to produce meaningful bounding boxes. This post-processing step produces bounding boxes, filters low-confidence boxes, and applies the NMS algorithm to remove overlapping boxes.
In DeepStream Python binding, you can develop the parser using Python functions and register this function as a DeepStream Probe to the source pad of the inference element.
Probes are a way to access and manipulate the metadata inside a DeepStream pipeline. You can read the “DeepStream Probes” section of our previous article for more information on probes and how to use them.
Keep in mind that, unlike Python bindings, in C++, you can develop and introduce this parser function to the DeepStream pipeline via the config file. Meanwhile, DeepStream will register the parser function on the Pipeline itself.
Since we are using ready-to-use object detectors, they already have the parser functions for the DeepStream SDK. So, the only modification we should apply to these functions to customize them for our application is to filter and remove every class other than the person. Let’s see how we could modify the parser functions in SSD-MobileNet and YOLO V3 to detach the person’s class from other objects’ classes.
a. SSD-MobileNet
As we mentioned in previous articles, Nvidia has provided the required codes for running the SSD-MobileNet model completely on Python. You can find this code’s Python parser function here.
This parser is used as a probe (pgie_src_pad_buffer_probe) in the DeepStream pipeline. After parsing the output, we filtered the irrelevant classes in the probe function using the following code:
lbl_id = frame_object.classId

 if lbl_id != 1:

      return
The first line gets the class ID from the frame_object metadata, and then if the ID is not 1 (person class ID), nothing will be put in the buffer.
b. YOLO V3
The DeepStream SDK has only provided the C++ codes for running the YOLO V3 object detector. So, since we want to develop our application in DeepStream Python binding, we should do some extra steps here:
Step 1: Download the YOLO V3 weights from here.
Step 2: Download the YOLO V3 config file from here.
Step 3: Filtering irrelevant classes in the C++ parser function:
To do so, you should find this function inside the Nvidia DeepStream docker container through this path:
/opt/nvidia/deepstream/deepstream-5.1/sources/objectDetector_Yolo/nvdsinfer_custom_impl_Yolo/nvdsparsebbox_Yolo.cpp
You must then add the below line to filter non-person classes (it is just like what we did in the Python parser of the SSD-MobileNet):
if (bbi.classId != 0) return;
Step 4: Build the C++ output parser by running these lines:
cd /opt/nvidia/deepstream/deepstream-5.1/sources/objectDetector_Yolo

CUDA_VER=11.4 make -C nvdsinfer_custom_impl_Yolo
These commands will create a .so file that you should keep the path of for the next step.
Step 5: Add the YOLO weights, YOLO configs, and path of the previous part’s .so file to the pertaining fields of the DeepStream config file. Here is the config file in our repository:
custom-network-config=yolov3-spp.cfg

 model-file=yolov3-spp.weights

 custom-lib-path=nvdsinfer_custom_impl_Yolo/libnvdsinfer_custom_impl_Yolo.so
4. Step two: Face Extraction
After detecting the persons’ body bounding boxes using one of the detectors, we should extract the face section from these boxes. We perform this step by registering a Probe to the Sink pad of the display element (nvdsosd).
As we said, in DeepStream Python bindings, you can manipulate the output of each element and its metadata in the pipeline using a Probe. Here, this Probe is a Python function that should have a specific interface (input). This function should get three inputs: pad, info, and u_data, and at the end, it should return an “OK” signal. Using this function, you can access the available metadata and apply any manipulations, such as changing, adding, or removing data.
def probe(pad, info, u_data):

      …

      …

      return Gst.PadProbeReturn.OK
The Metadata can be extracted from the info using these lines:
gst_buffer = info.get_buffer()

 batch_meta = pyds.gst_buffer_get_nvds_batch_meta(hash(gst_buffer))
As discussed in our previous article Metadata section, DeepStream Metadata has a hierarchical structure. Therefore, you should retrieve the frame metadata from “batch_meta,” and other important information, such as bounding boxes and displaying metadata, are inside “frame metadata.”
When the pipeline reaches the display element, all the processing and inferences have been applied to the video frames. All the bounding box info is available inside the object meta-list in the NvDsFrameMeta. We can retrieve this information as follows:
l_obj = frame_meta.obj_meta_list
Then we iterate over this list and extract the bounding box of each object:
while l_obj is not None:

      try:

            obj_meta = pyds.NvDsObjectMeta.cast(l_obj.data)

      except StopIteration:

            break

 rect_params = obj_meta.rect_params
We will now create an approximate bounding box for the faces using the body bounding boxes. In order to find the height of the upper body, we divide the body height by four. Additionally, we shrink the width of the box to omit the shoulders. Then, we’ll adjust the top-left point of the box to be more appropriate for the face bounding box.
width = int(rect_params.width / 1.5)

 height = int(rect_params.height / 4)

 left = rect_params.left

 top = rect_params.top

 rect_params.left += int(width / 2)

 rect_params.top -= int(height / 3)

 rect_params.width = width

 rect_params.height = height
The body bounding boxes are now changed to the approximated face bounding boxes. We are now ready to anonymize the faces at the final stage.

5. Step three: Face Anonymization
We can now anonymize the faces using the extracted bounding boxes in the previous stage. DeepStream stores the visualization information of each bounding box, such as background color, border color, and border width inside rect_params metadata. So, we will easily change the background color of each face bounding box to a dark color using the same probe we created for face extraction (we can use any RGBA combination) and make the faces unrecognizable. Here is how we did it:
rect_params.has_bg_color = 1

 rect_params.bg_color.set(0, 0, 0, 0.85)
The color format of bg_color is RGBA, and each channel can be a float number between zero to one.
6. Conclusion
The Nvidia DeepStream enables you to build end-to-end video analytics services for real-time applications. DeepStream is fast, scalable, and Nvidia GPU compatible, and it works well with streaming media for real-time use cases. Developers, however, must invest a lot of time and effort in optimizing their DeepStream applications. To streamline the process of using DeepStream Python bindings, we have decided to share our experiences in a series of articles.
In this trilogy, we tried to simply explain the Nvidia DeepStream SDK capacities and how to use them in practice. We also tried to clarify how to use DeepStream Python bindings to improve your computer vision applications. We first explained deploying our object detection Model on X86s and Jetson devices using NVIDIA DeepStream and Triton Inference Server. Then we described how to start with DeepStream and use its Python bindings to customize your applications, and finally, we took an actual use case and tried to build an application using this Nvidia tool.
By reading this Trilogy, you can answer the following questions:
1- What are the main components of an Nvidia DeepStream Pipeline?
2- What are the important Elements in the pipeline?
3- What are Probes, Pads, and Buffers?
4- What is Metadata in DeepStream?
5- How to create a DeepStream Pipeline and connect its elements?
6- How to customize your applications using DeepStream Python Bindings?
7- How to deploy your models on DeepStream using TensorRT and Triton Inference Server?
8- How to build a simple Face Anonymizer using DeepStream SDK in Python?
This is the last article on our Nvidia DeepStream series for now. In future articles, we will discuss other computer vision applications in real-world problems, including fall detection. It is our goal to solve product-level problems in the CV world and share our findings with everyone.
You can tell us what to talk about in the future. Feel free to keep in touch and ask your questions through the contact us form or via hello@galliot.us.
Get Started
Have a question? Send us a message and we will respond as soon as possible.
Leave us a comment