Deploying a Custom SSD MobileNet Model on the NVIDIA Jetson Nano
In this post, we explain how we deployed an SSD MobileNet TensorFlow model on NVIDIA Jetson Nano using the TensorFlow Object Detection API.
This is a tutorial on Deploying a Custom SSD-MobileNet-V2 Model on the NVIDIA Jetson Nano. The resulting code is available on Galliot’s GitHub repository.
Find Galliot’s other Computer Vision Products on this page.
More and better data results in more robust models; Explore Data Labeling Approaches and Challenges
Embedded devices, such as NVIDIA Jetson Nano, enable powerful AI-based applications in real-time at very low power and cost. However, deploying deep learning models to these devices requires model optimization, which is not always straightforward. In this post, we explain how we deployed a retrained SSD MobileNet TensorFlow model on an NVIDIA Jetson Nano development kit using the latest version of the TensorFlow Object Detection API. We also investigated the errors that we encountered during the procedure and how we solved each one.
1. The workflow
NVIDIA TensorRT is a programmable inference accelerator that facilitates high-performance inference on NVIDIA GPUs. TensorRT takes a trained neural network as input and generates a TensorRT engine, a highly optimized runtime engine that performs inference efficiently. TensorRT-based applications perform up to 40x faster than CPU-only platforms during inference. TensorRT SDK provides FP16 and INT8 optimizations to perform low-latency inference with little to no degradation in model accuracy.
TensorRT takes your network definition, performs several optimizations, and generates a TensorRT engine to optimize your model for inference. The optimizations include platform-specific optimizations, layer optimizations, operation optimizations, etc. Visit TensorRT Developer Guide by NVIDIA to learn more about TensorRT and how it performs optimizations.
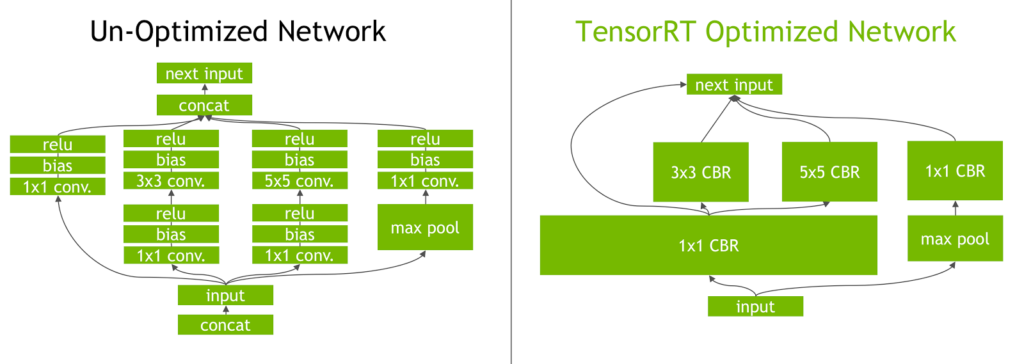
Figure 1. The Inception module from the GoogLeNet architecture, before and after TensorRT layer optimizations.
(source: NVIDIA Developer Blog)
Models trained with TensorFlow can be deployed on Jetson Nano in two ways: you can either use TensorFlow with TensorRT (TF-TRT) or convert the TensorFlow model to UFF (Universal Framework Format) and generate a TensorRT execution engine from that. The full documentation on how to use TensorFlow with TensorRT (TF-TRT) is available here. We will focus on the second approach for this post as it outperforms TF-TRT.
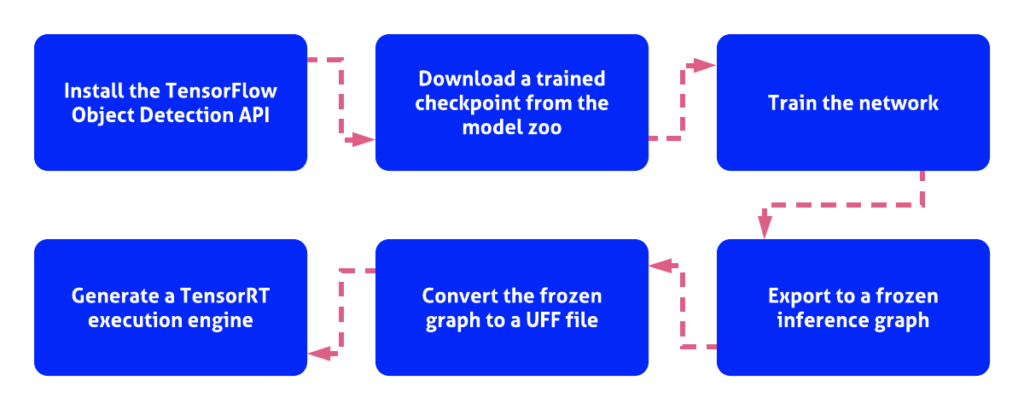
To construct a TensorRT engine, first, download and install the TensorFlow Object Detection API. The easiest way to get this API installed is to use a Docker container. You can run Galliot’s Docker container by following the instructions here to install TensorFlow Object Detection API with minimal effort.
After getting the API installed, you need to download a trained checkpoint from the TensorFlow object detection model zoo, where you can explore various pre-trained models. For this tutorial, we used the SSD MobileNet V2 COCO model. You can train the network starting from the downloaded checkpoint using your training data. Before starting the training procedure, you might need to make some changes to the corresponding config file (find it here). We changed the number of classes to one object class, i.e., pedestrian, to use this model in our Smart Social Distancing application.
When training is completed, export the trained model to a frozen inference graph using the export_inference_graph.py tool. Now we need to: 1- convert the frozen graph to a UFF file and 2- generate a TensorRT execution engine from the UFF file.
Constructing a TensorRT engine by following the steps illustrated in Figure 1 may seem straightforward enough, but it is not. The problem is that the latest version of the TensorFlow Object Detection API is not compatible with the tools and configuration files required for UFF parsing and generating a TensorRT engine from a UFF file. Therefore, you have to decide between using a relatively old version of the Object Detection API (from early 2018) without all the new features and optimizations or using the latest version of the Object Detection API and trying to fix all the compatibility issues that will arise during the procedure. Fortunately, it is not that difficult to fix compatibility issues, so let’s do that.
In the next section, we explain how to perform the TensorRT conversion process and describe the problems we encountered during the conversion process as well as the fix to each one. We were able to successfully convert a custom SSD MobileNet model to UFF and build a TensorRT engine by applying the below fixes to each problem.
Software used:
- TensorFlow 1.15
- TensorRT 6.0.1.10 – Jetpack 4.3
- Python 3.6
- TensorFlow Object Detection API. May 8, hash:
394baa9f21424d3522ccfbdcee8acd3840891ff6
The following fixes are also tested using the TensorRT version 7.0.0.11 using an NGC Docker container on an AMD64 node with all the steps required.
2. Generating TensorRT engine
You can use NVIDIA’s convert-to-uff.pbUFF. You should call this tool with a -p
In this post, we used the single program setup instead of using the convert-to-uff
Installing the Prerequisites
To perform the conversion process, you need to have Jetpack 4.3, TensorFlow 1.15, and PyCuda installed on the Jetson Nano. You can either install each requirement separately or run Galliot’s Docker container to get all the required dependencies installed on your device in just a few minutes.
This Docker container installs all the prerequisites, including PyCuda, and runs the install.shtensorrt_demoslibflattenconcat.soinstall.shbuild_engine.py
Configurations
To use Galliot’s TensorRT Generation Tool, you should first add your custom model specs to the config file that matches your model. We have provided sample config files for SSD MobileNet v1 and v2 here.
You may need to customize the number of classes by changing the num_classes.pbtxt
[MODEL]
Name = ssd_mobilenet_v2_coco
Input = /repo/ssd_mobilenet_v2_coco.pb
; Path to the Input Frozen Inference Graph
TmpUFF = /repo/tmp_ssd_mobilenet_v2_coco.uff
; Path for writing the output UFF model
OutputBin = /repo/TRT_ssd_mobilenet_v2_coco.bin
; Path for writing the output TensorRT Engine
NumberOfClasses = 91
; number of classes plus one for the background class
MinSize = 0.2
MaxSize = 0.95
InputOrder = 1,0,2
; Order of `loc_data`, `conf_data`, and `priorbox_data` of the model, which is set equal to the `NMS` node input order in the `.pbtxt` file
InputDims = 3,300,300
; Input Dimension of the model
DownloadPath = https://raw.githubusercontent.com/jkjung-avt/tensorrt_demos/master/ssd/ssd_mobilenet_v2_coco.pb
; Model Download Path

[LIBFLATTENCONCAT]
Path = /repo/libflattenconcat.so.6
Conflicts and errors
Since we wanted to use the latest version of the TensorFlow Object Detection API, there were a few compatibility issues that we needed to take care of. We made a few changes to the build_engine.py
FusedBatchNormV3 error
[TensorRT] ERROR: UffParser: Validator error: FeatureExtractor/MobilenetV2/layer_19_2_Conv2d_4_3x3_s2_256/BatchNorm/FusedBatchNormV3: Unsupported operation _FusedBatchNormV3
The FusedBatchNormV3FusedBatchNorm
AddV2 error
[TensorRT] ERROR: UffParser: Validator error: FeatureExtractor/MobilenetV2/expanded_conv_15/add: Unsupported operation _AddV2
Similar to the previous conflict, this error was raised because AddV2 is not supported by the TensorRT 6. To fix this issue, we replaced AddV2Add, as shown here.
Cast error
[TensorRT] ERROR: UffParser: Validator error: Cast: Unsupported operation _Cast
This error was raised because the model included an Input operation that is not supported by the TensorRT 6, which is the Cast operation. TensorFlow version 1.15 has replaced this operation with the toFloat operation. Therefore, we should add Cast to the namespace_plugin_map
namespace_plugin_map = {
"MultipleGridAnchorGenerator": PriorBox,
"Postprocessor": NMS,
"Preprocessor": Input,
"Cast": Input,
"ToFloat": Input,
"image_tensor": Input,
"MultipleGridAnchorGenerator/Concatenate": concat_priorbox, # for 'ssd_mobilenet_v1_coco'
"Concatenate": concat_priorbox,
"concat": concat_box_loc,
"concat_1": concat_box_conf
}
GridAnchor error
[libprotobuf FATAL /externals/protobuf/aarch64/10.0/include/google/protobuf/repeated_field.h:1408] CHECK failed: (index) < (current_size_):
The UFF parser raised this error because the UFF file did not provide an input element for the GridAnchorGridAnchor node:
def parse_gridAnchor(graph):

data = np.array([1, 1], dtype=np.float32)
anchor_input = gs.create_node("AnchorInput", "Const", value=data)
graph.append(anchor_input)
graph.find_nodes_by_op("GridAnchor_TRT")[0].input.insert(0, "AnchorInput")

return graph
All of the errors and conflicts above are fixed here on Galliot’s GitHub repo. You can use the provided Docker container and customize the config file to generate a TensorRT engine on Jetson Nano from your SSD MobileNet model.
3. Conclusion
Deploying a custom deep learning model on embedded devices is a challenging task. In this tutorial, we went through deploying a custom SSD MobileNet model on Jetson Nano and explained some issues we faced when trying to convert a frozen graph retrained by the latest version of the TensorFlow Object Detection API to a UFF file using TensorRT, as well as the fixes we applied to those problems. Check out Galliot’s GitHub repo for more.
Further Readings
1) Deploying SSD mobileNet V2 on the NVIDIA Jetson and Nano platforms
This blog post explains the challenges faced while deploying a customized object detection neural network on NVIDIA-based mobile platforms like Jetson and Nano and how the authors found solutions to those problems. They provide a configuration file and code that can be used to deploy pre-trained networks.
2) NVIDIA Deep Learning TensorRT Documentation
This guide explains the NVIDIA TensorRT 8.6.0 Early Access (EA) samples on GitHub and the product package. These samples cover areas like image classification, object detection, recommenders, character recognition, and machine comprehension.
3) TensorRT Python Sample for Object Detection
This is a GitHub repository that contains code for object detection using TensorRT, an NVIDIA library for optimizing deep learning models.
Get Started
Have a question? Send us a message and we will respond as soon as possible.
Leave us a comment