Adaptive Learning Service Tutorial
Galliot Adaptive Learning Vision for building specialized object detection models
In this tutorial, you will find a step-by-step guide on how to use Galliot’s new Adaptive Learning edge vision Service and build a specialized lightweight Object Detection model for your environment.
Here is a tutorial on Galliot’s Adaptive Learning solution for building specialized Computer Vision models.
Visit our previous article to know What is Galliot Adaptive Learning Object Detection?
Every computer vision model requires high-quality data. Read our guide to data labeling solutions to get familiar with this vital process.
1. Adaptive Learning; An Automatic Model-Personalization Tool
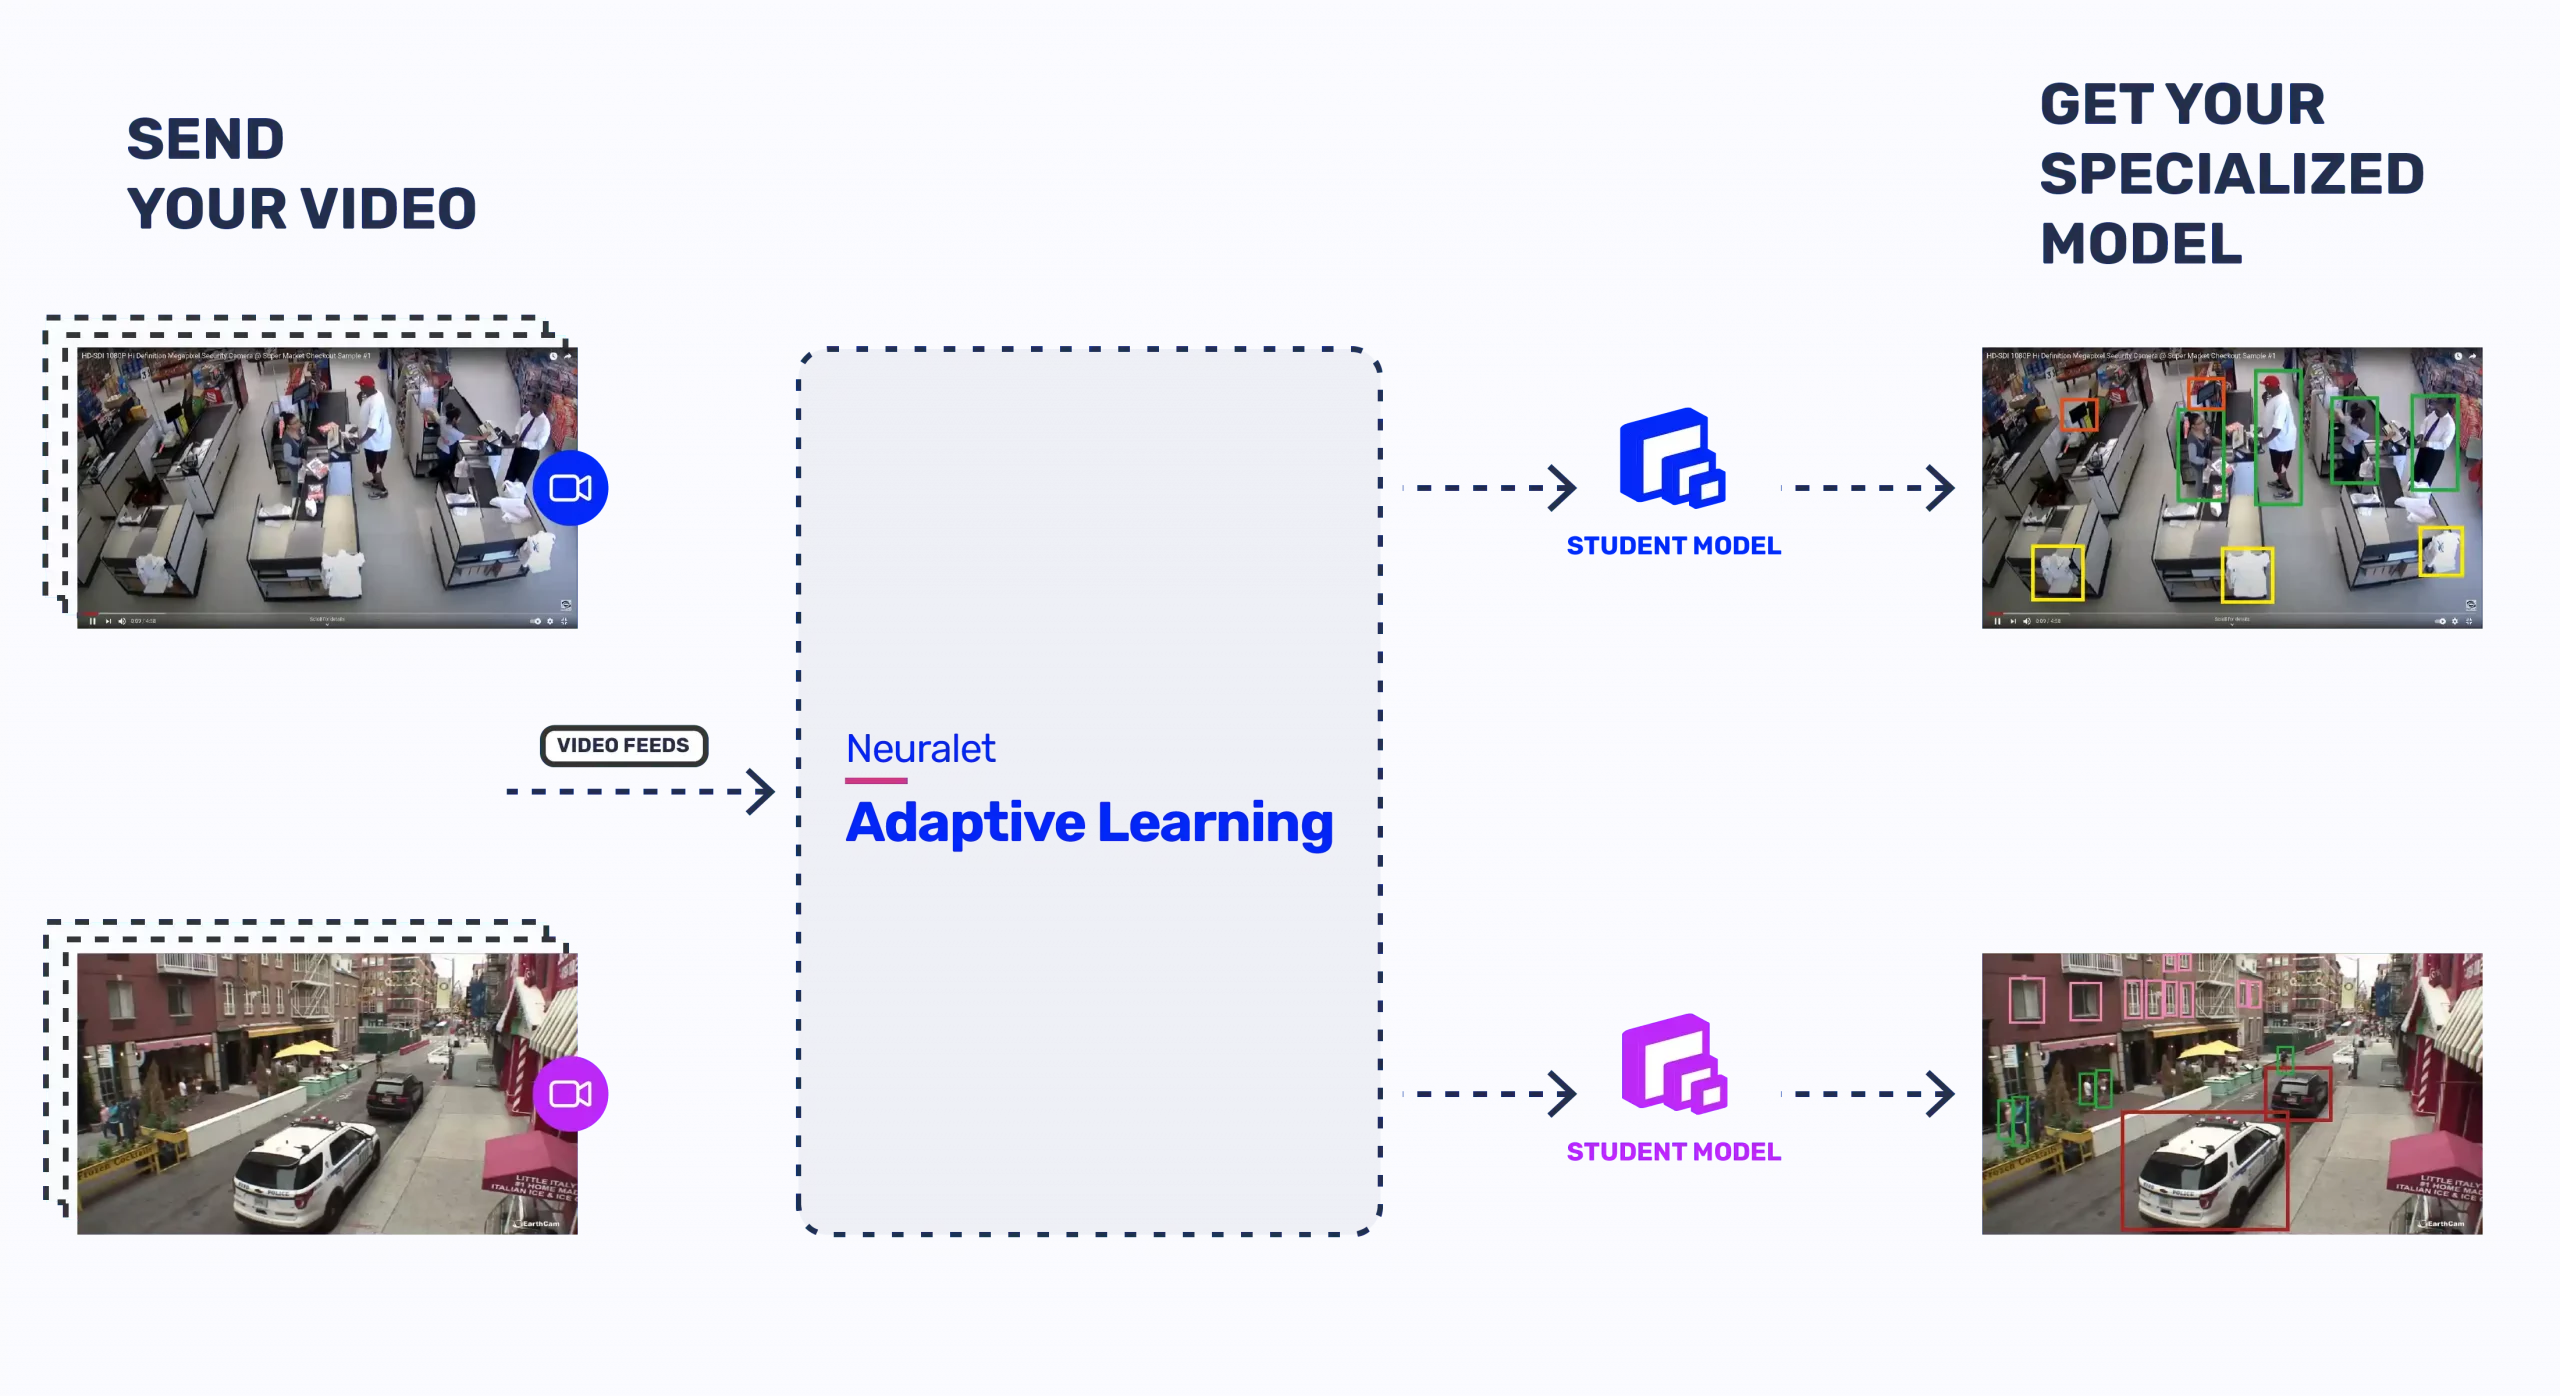
As explained in our “Adaptive Learning” article, Adaptive Learning is a technique that brings about personalized and efficient Deep Neural Networks (DNNs) with accurate outputs that can adapt to new environments and fresh (formerly unseen) data sets without any manual data annotation.
For instance, if you need to deploy an object detection model for your company’s production line, danger zones, etc., you can use a generalizable heavy model with a highly accurate performance in different conditions and environments or employ a lightweight model with real-time performance that is not as generalizable and accurate. In both scenarios, there are some constraints and benefits.
If you choose the first option – the heavy model, you will have a pretty generalized network with high accuracy at the cost of computational complexity and low speed. You will also not be able to deploy your model on edge devices that have major resource limitations.
In the second option, by employing a lightweight network, you will have a model with higher speed and relatively much lower computational costs, which can be deployed on edge devices, such as Google Edge TPU or Nvidia’s Jetson family of devices for real-time applications. However, the results are less accurate and cannot be generalized on unseen data from a different environment.
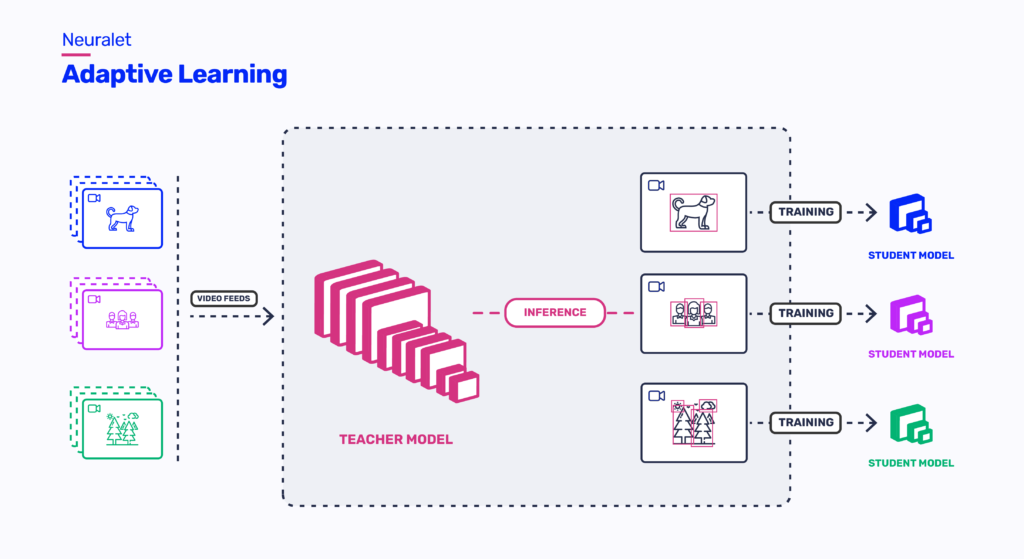
Traditionally, if someone wanted accuracy and speed, they had to gather and annotate data from scratch for each new environment and then use this dataset to train a lightweight model specifically for that environment. However, data annotation is not automatic and is done by humans, making it highly time-consuming. The Adaptive Learning method solves this problem by using two kinds of networks: Teacher and Student. We train a lightweight student network for each new environment using the labels generated by a complex network (Teacher) trained on rich datasets that can generalize well to new environments. This method significantly increases the student model accuracy. In conclusion, we can infer that adaptive learning is a favorable solution to the stated problem, leaning on many reasons. Such as; No necessity for data annotation, Efficient specialized models (deployable on edge devices), and Accessibility; since its lightweight model runs on any edge device that is accessible everywhere.
2. Galliot Adaptive Learning API
Galliot Adaptive Learning Service is designed to customize the object detection models to datasets and environments as provided by customers. Considering user constraints on running our previous adaptive learning module, we decided to provide a service that eliminates the complexities and automatically carries out the configurations. In this service, we resolved resource limitations by providing training machines so users do not need any further local training resources such as GPUs. This means that the user can send a video, specify requirements, and request model adaption to the dataset. After the training process, the user can download the trained student model.
Alongside the Adaptive Learning API, we have the Galliot Edge Object Detection, which is an open-source module containing supplementary codes created to take actions on your trained model. We have provided the required scripts for exporting your models or running inferences on various edge devices. Moreover, in this module, we have created a client code that is, in fact, an interface for users to connect with the provided Adaptive Learning API. Using this client code written in Python, you can call the API’s endpoints, such as uploading a video, requesting status, or downloading the model by running a few simple commands.
3. How to run my Adaptive Learning Object Detection model
There are two methods to call different endpoints of Adaptive Learning API. The first uses the curl’s command-line tool in which the user should type raw commands, and the other is to use our simple Python Client interface.
To use our client interface, you need to have Python on your machine, clone our GitHub repository to your system, and go to the provided directory using the commands below.
git clone https: https://github.com/neuralet/edge-object-detection.git
cd edge-object-detection/services/adaptive-learning/client
Whether you prefer to use curl
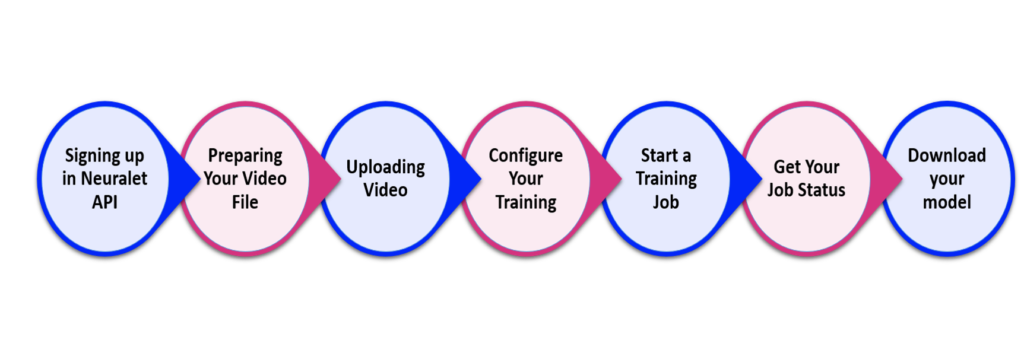
Step 0: Signing up for Galliot Adaptive Learning API
In the beginning, you need to go to our API home page and sign up using your email address and password. A verification link will be sent to your email address by clicking on the sign-up button. After verifying your account, you can sign in to Galliot’s Adaptive Edge Vision API. Now you can get your token using the provided section and keep it for the next steps.
Step 1: Preparing the Video File
In the first step, you upload the video file. Since our API only accepts zipzipinput.zip
zip -j input.zip PATH_TO_Your_VIDEO_FILE
Step 2: Uploading Video
After creating the input.zipunique id (UUID)
Client Code:
If you are using the client code, you should first save your token (provided to you in step0) as a text file and type the path to this file instead of TOKEN_PATH in the Python command below. The FILE_PATH is the address to the input.zip file that you have created in step 1. After running the Python command successfully, the unique id (UUID)
python3 client.py --token TOKEN_PATH upload_file --file_path FILE_PATH
Curl Commands:
If you prefer to work with the curl
- Get Upload URL:
In this part, you should only copy your token (provided to you in step0) and paste it instead ofTOKEN
curl -X GET "https://api.neuralet.io/api/v1/file/upload/" -H "accept: application/json" -H "Authorization: Bearer TOKEN"
After running this command, it will return a jsonnameunique id (UUID)upload_linkUploadURL
- Upload File:
In this stage, you must put theUploadLinkUploadURLFILE_PATHinput.zip
curl "UploadURL" --upload-file FILE_PATH
Step 3: Configure Your Training
In order to start the adaptive learning process on your file, you should tune and modify the sample_config.json
There are two mandatory fields in the sample_configUUID provided to you in the previous step) in front of the UploadUUIDVideoFilesoftbio.mp4
UploadUUID = Your_Unique_ID
VideoFile = Your_video_File_Name.mp4
In addition, there are a few more fields presented in the sample config file that you can modify based on your requirements. For example, in the config file’s Classes"coco"QuantizedModel
To do this, you need to adjust the sample config file on the configs/
| Parameter | Options | Comments |
|---|---|---|
| Teacher | UploadUUID | UUID | Unique id of uploaded input.zip file. |
| Teacher | VideoFile | String | Name of the video you have zipped and uploaded. |
| Teacher | Classes | Comma-Separated strings without space | A list of class names that you want to train your model on. These classes should be a subset of COCO classes. You can find the COCO’s category names in their original paper. To train on all of the 90 COCO classes, just put”coco“. |
| Student | QuantizedModel | true or false | This parameter indicates whether to train the student model with a quantization-aware strategy or not. This is especially useful when you want to deploy the final model on an edge device that only supports |
Step 4: Start a Training Job
In this step, you can request to train your adaptive learning model by running the command using either the Client code or Curl
Client Code:
Same as the second step, you need to input the path to your token text file instead of TOKEN_PATHconfig_path
python3 client.py --token TOKEN_PATH train --config_path CONFIG_PATH
Curl Commands:
Again, similar to the second step, you should copy-paste the token we provided to you at the beginning instead of TOKENJSON_CONFIGFILE_PATH
curl -X POST "https://api.neuralet.io/api/v1/model/train/" -H "accept: application/json" -H "Content-Type: application/json" -H "Authorization: Bearer TOKEN" -d @JSON_CONFIGFILE_PATH
Step 5: Get Job Status
At this moment, your model is training on Galliot’s servers, which may take from a few hours to a couple of days to finish depending on the video length. If you want to know your model’s status use this command.
In this stage, you can request a job status using the Job id generated in the last step to observe the operation progress.
Client Code:
Enter the address to your token text file and your Job id, respectively, in the provided TOKEN_PATHJOBID
python3 client.py --token TOKEN_PATH get_status --job_id JOBID
Curl Commands:
You only need to repeat the previous step and copy-paste your token in the TOKENJOB_ID
curl -X POST "https://api.neuralet.io/api/v1/model/status/" -H "accept: application/json" -H "Content-Type: application/json" -H "Authorization: Bearer TOKEN" -d "{\"job_id\":\"JOB_ID\"}"
By running the command and sending your request to our API, you may get one of the following messages for either the Teacher or Student models each time you request the status:
– Allocating Resources: We are Allocating Resources (e.g., a computing machine) to your job.
– Building: We have allocated the resources, and the program is Building an environment (installing the required packages) to start your job.
– Training: The Training process has started. An Adaptive Learning Job is Running.
– Wrapping Up: Your training is about to finish and is Saving data and completing the job.
– Finished: The job has been finished successfully.
– Failed: If the process faces an infrastructural or hardware problem, such as Galliot’s server failure, you will see this message.
– Not Reached Yet: It usually appears as the student model’s status, which means the job’s workflow has not reached the student model’s training phase yet (i.e., while the teacher model is running, the student model’s status will be Not Reached Yet).
– Unexpected Error: An internal error has occurred.
Step 6: Download your model
You can download your Adaptive Learning’s trained student model by running one of the following commands based on your preference. You will receive a file named output.zip
Client Code:
You should insert the address to your token file in the TOKEN_PATHJOBID
python3 client.py --token TOKEN_PATH download_file --job_id JOBID
Curl Commands:
If you are using the curl, there are two stages to finally get your output file:
- Get your upload link:
As in step five, you need to copy-paste the token and job id you saved in previous steps in theTOKENJOB_IDupload_link
curl -X POST "https://api.neuralet.io/api/v1/file/download/" -H "accept: application/json" -H "Authorization: Bearer TOKEN" -H "Content-Type: application/json" -d "{\"job_id\":\"JOB_ID\"}"
- Download your file:
Now by putting theupload_link
wget "upload_link" -O output.zip
4. What does the output.zip file contain?
After extracting the output.ziptrain_outputstrain_ouputs
First, we are going to introduce the most important files inside the train_ouputs
validation_vid.mp4:
This is a video with a maximum length of 40 seconds, which compares the results of running an SSD-MobileNet-V2 model trained on COCO (Baseline model) and the Adaptive Learning trained model (Student) on a validation set video (Not used in the training process).
label_map.pbtxt:
This pbtxt file contains a series of mappings that connects a set of class IDs with the corresponding class names. To run the inference module of our Edge Object Detection Repo, you should pass this file to the script to classify each object with the right name.
events.out.tfevents:
If you want to monitor and analyze your training process, you can open this file using TensorBoard and observe each step of the Adaptive Learning model training process.
So far, we have introduced the most important files in the train_outputstrain_outputs/frozen_graph
train_outputs/frozen_graph:
This is the main directory of our trained model, which contains the required files for inferencing and exporting to edge devices.
train_outputs/frozen_graph/frozen_inference_graph.pb:
To run your model on Jetson, you should pass this file to the export module that we have built for edge object detection. This will export and create a TensorRT engine for you.
train_outputs/frozen_graph/detect.tflite:
If you set your QuantizedModeltruefrozen_graph
The importance of this file is for exporting your model to the EdgeTPU. In this case, our EdgeTPU exporter accepts this detect.tflitetflite
train_outputs/frozen_graph/saved_model:
The frozen_graph/saved_model
5. Conclusion
This article introduced the Galliot Adaptive Learning API and its features. Using this service, you can customize your object detection tasks for any specific environment by implementing the teacher-student configuration without any training resources or strong technical knowledge. Below, there is an example video of the results on an object detector using an adaptive learning method (at the bottom) compared to the baseline (at the top).
Galliot’s team is constantly working to share its experience and simplify AI development for real-world applications. Do not hesitate to send us your comments and help us improve our content. If you have further questions or would like to work with us, please get in touch with us via hello@galliot.us or the contact us form.
Leave us a comment
Comments
Get Started
Have a question? Send us a message and we will respond as soon as possible.
Thanks for sharing superb informations. Your web site is very cool. I am impressed by the details that you have on this website. It reveals how nicely you understand this subject. Bookmarked this web page, will come back for more articles. You, my friend, ROCK! I found simply the information I already searched everywhere and simply could not come across. What a great web-site.